Saturday, July 24, 2021

Mercedes SD Connect C4. Switching Wi-Fi channels if not stable wireless connection


mb sd c4 plus dell630

Switching Wi-Fi channels if not stable wireless connection between the multiplexer SD Connect C4 and laptop. For Road24h mode.

Wireless connection Wi-Fi has 14 channels. Depending on the country, the number of permitted channels may be reduced. So for example Ukraine and Russia are used 13 channels. For some WiFi adapters are available on 11 channels only. Often, in the presence of a lot of number WiFi networks, all channels are involved. Moreover, each channel can operate multiple devices at the same time, it creates instability of equipment operation. In particular, in the case of multiplexer SD Connect, when congestion currently used channel or if there is other interference, you may experience slow operation or an intermittent open WiFi connections. In this case, it is advisable to change the channel number. This can be make in the settings of the WiFi adapter of the laptop. To do this, go to the folder “network connections”, right-click on “wireless connection”/ properties / configure / advanced. In the left column, find the line “Channel Ad Hoc 802.1 b/g” in the right column/window will appear to enter (select) a channel number. See screenshot:

Change channel number to any another one, different of the default, and confirm all Windows with “OK”. Changes do not always immediately take effect, it is desirable to restart the laptop. If after download the laptop WiFi connection to the multiplexer is not established automatically, restarting the multiplexer. Not the fact that the selected channel will be less congested than the previous one, in this case, the procedure must be repeated. There are programs-scanners, allowing to estimate the workload of Wi-Fi channels, but usually experimentally possible to find a relatively free channel.

Friday, July 23, 2021

How to Install SD Connect C4 multiplexer batteries


Mercedes SD Connect C4. Install the batteries.

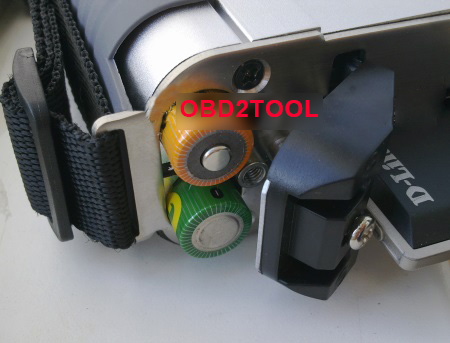
When installing batteries follow the correct polarity according to the image:

SDConnect-C4-Install-the-batteries

sdconnect-batteies
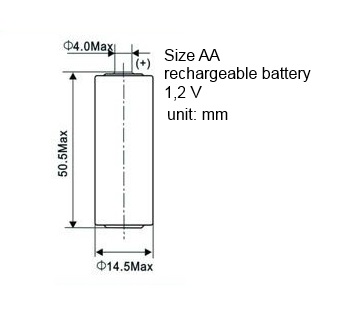
It is recommended to operate the multiplexer SD Connect C4 with established internal batteries. Size AA Ni-Cd 1.2 V. the recommended capacity of 2400 — 2800 mA/h.

The need for internal batteries is caused by:

1. firstly that the multiplexer SD Connect which was fully independent of the computer, running the Linux operating system, “gross” power-off that occurs when unpulling the diagnostic cable from the vehicle and then loading up the device when you reconnect to the car it is not advisable, and in some cases, may lead to breakage of the multiplexer
2.  second, in the absence of internal batteries, at the time of engine start in a vehicle voltage of the vehicle, and hence in the power supply circuit of the multiplexer appearsudden voltage power supply that can cause loss of connection between the multiplexer and PC, and in some cases, may lead to breakage of the multiplexer

The presence in the SD Connect battery allows you to keep it in working condition as if disconnected from the vehicle at the time of the sagging of the supply voltage and eliminates the need to re-download the next time you connect to the diagnostic connector.

In mode, the power only from internal battery (disconnected from the diagnostic connector), it is possible to switch the multiplexer into “sleep mode”, which is not possible with power from the car. A complete shutdown of the device is not provided. It possible by  taking out the batteries or changing the power diagram (see video).

Without changes in power diagram, long-term, without the use, storage multiplexer, batteries should be removed, as in sleep mode, the standby quiescent current is 10-60 mA with periodic jumps up to 190 mA. With the recommended battery capacity is 2400 mA/h, and provided that they are 100% pre-charge ensure retention sleep mode in only 3 to 7 days. Further, the voltage of the battery falls below critical, which negatively affects their service life.

Before removing the batteries, switch the multiplexer in STANDBY/SHUT DOWN. At the time of connection to the vehicle connector, the instrument automatically exits sleep mode and begins charging the internal batteries.

Capacity of used batteries in multiplexer Mercedes Star Diagnostic SDConnect C4 must be at least 2000 mAh.

The message on the display “insert the battery” or “check battery” may indicate a capacity loss of one or more batteries or a bad contact in the circuit of the batteries. The increase in the total internal resistance of the battery module by more than 1 Ohm is causing the message about not working properly or the lack of batteries.

Thursday, July 22, 2021

How to configure SD Connect Road24h mode. Setup connection


SD Connect configuration Road24h . Setup and connection via LAN cable and Wi-Fi direct connection.

1.  Configuration Road24h mode for Windows XP.
2.  Configuration Road24h  mode for Windows 7.

1 . SD Connect configuration Road24h mode for Windows XP.

1.1. Make the configuration of the laptop for the LAN connection.

Connect the device to power supply and to the laptop by cable.

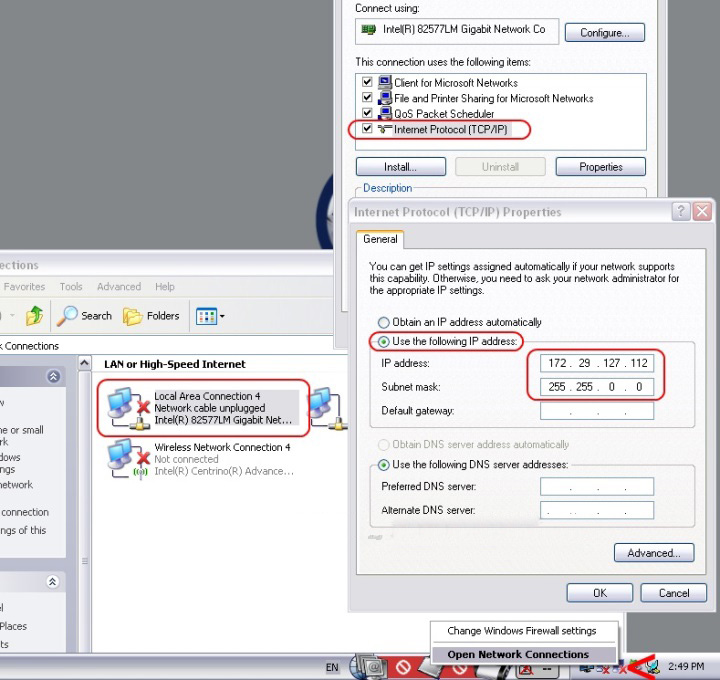
Make the LAN settings connections: network connections/local area connection/properties/TCP/IP in accordance with the screenshot below:

SD-Connect-configuration-Road24h-mode-Setup-connection-1

Everywhere click OK, the connection is established :

SD-Connect-configuration-Road24h-mode-Setup-connection-2

The device is ready for operation via the lan connection.

1.2. Make the configuration of the laptop for the WiFi connection.

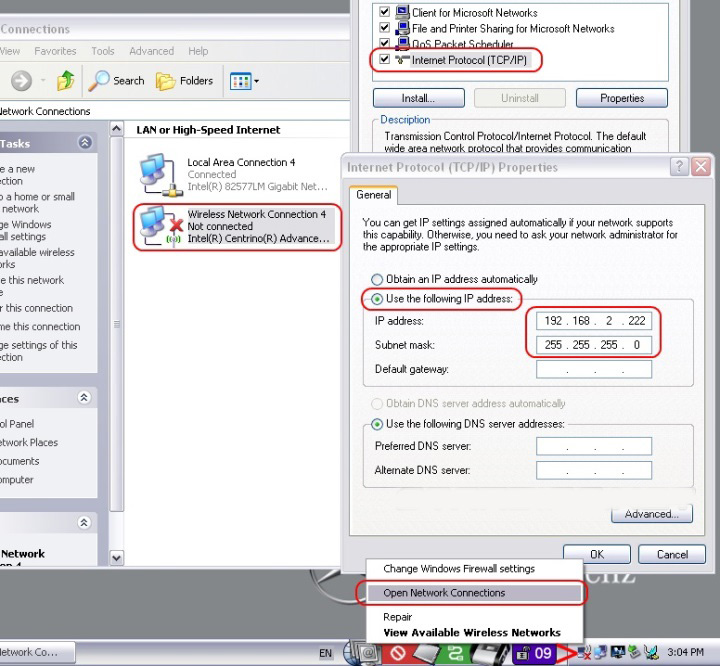
Go to network connections/wireless network/properties/TCP/IP

Custom WiFi connection for the computer :

SD-Connect-configuration-Road24h-mode-Setup-connection-3

Click on all windows OK.

1.3. Create a wireless network Road24h.

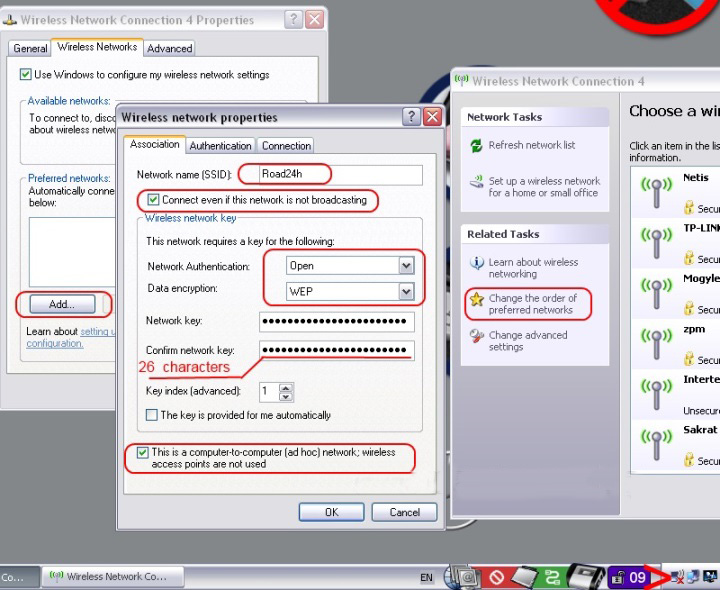
Open the wireless networks list. Click “change the order of preferred networks” in the new window create a network to connect to by default Road24h. Enter the settings according to the screenshot:

SD-Connect-configuration-Road24h-mode-Setup-connection-4

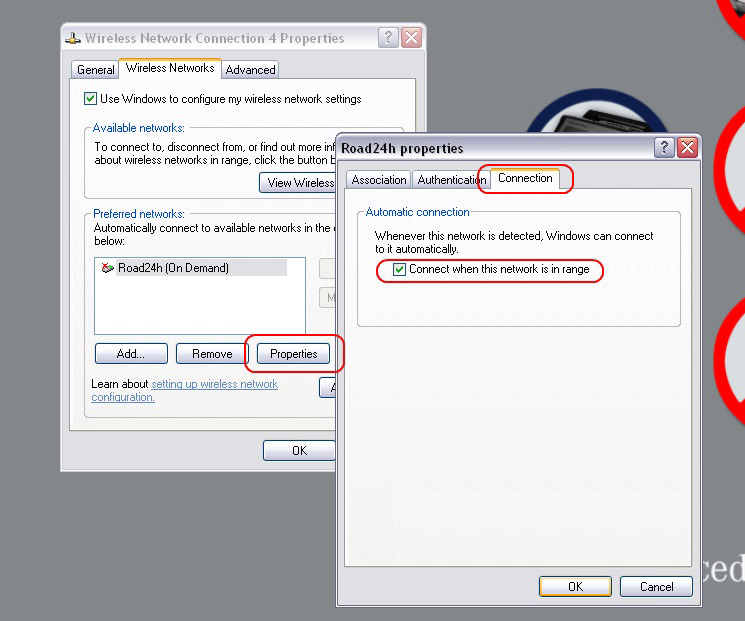
Confirm in the last window OK. See the list of preferred networks, a network Road24h. Click properties, note the check box automatically connect, confirm OK:

SD-Connect-configuration-Road24h-mode-Setup-connection-5

We can see that our network has received the status of “automatically”. Click OK. Check that the created network in the networks list:

Set-up-WiFi-connection-SDConnect-WORKSHOP-for-Windows-8-10-6

1.4. Make configuration of a multiplexer for a wireless connection Wi-Fi.

The appliance must be connected by cable and connection on a local network.

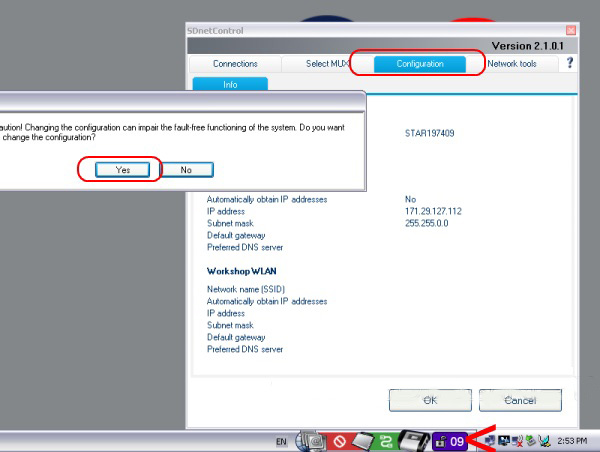
Go to SDconnectControl (lower right corner of your desktop) click in the system tray SDNC. Click “configuration” and confirm “Yes”:

SD-Connect-configuration-Road24h-mode-Setup-connection-7

Select the tab “MUX” and “register/configure”:

Set-up-WiFi-connection-SDConnect-WORKSHOP-for-Windows-8-10-8

Opens the configuration window of the multiplexer.

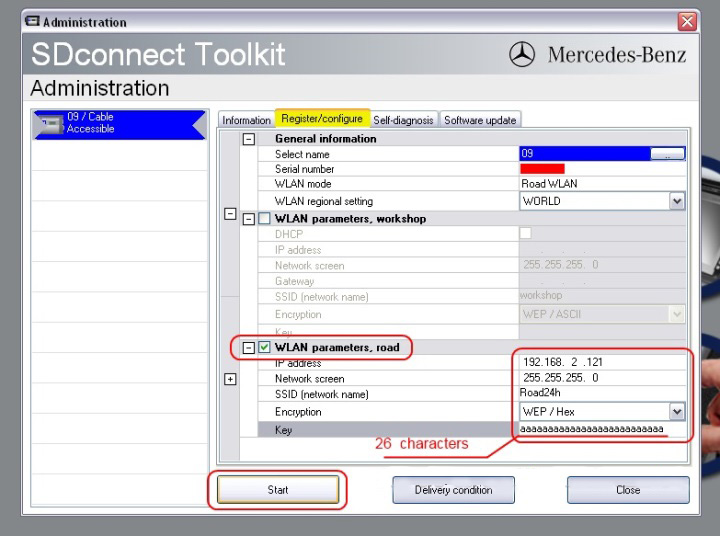
Make WiFi network settings for multiplexer in accordance with screenshot :

SD-Connect-configuration-Road24h-mode-Setup-connection-9

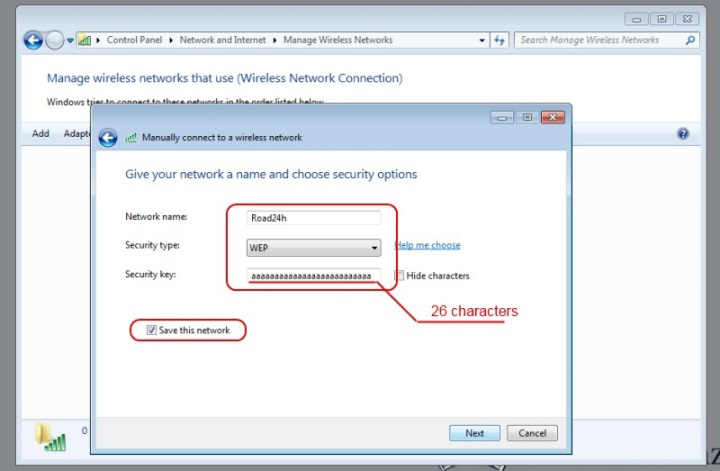
The network key is 26 characters. In this case, 26 English letters “a” in lowercase.

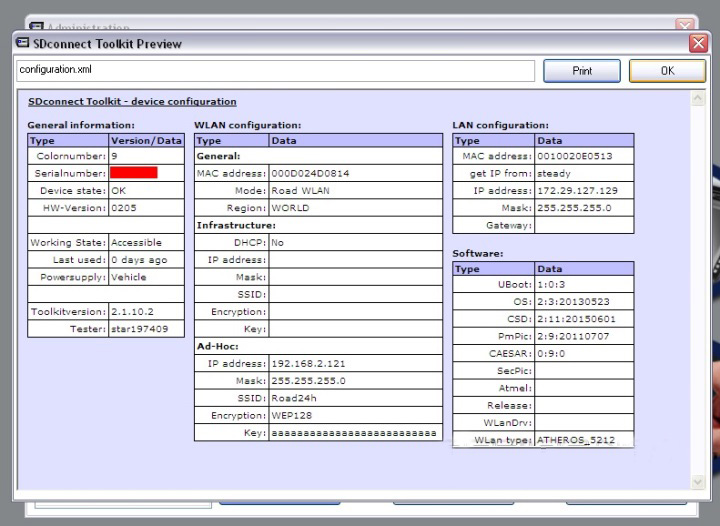
Click start and should see this result :

SD-Connect-configuration-Road24h-mode-Setup-connection-10

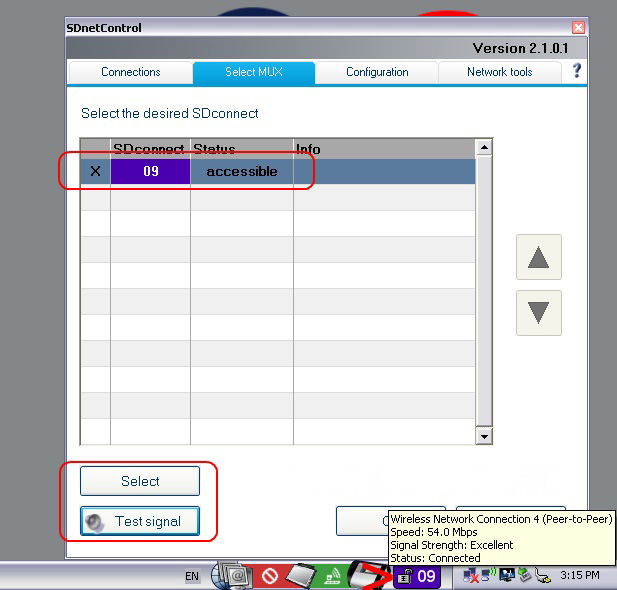
Disconnect the LAN cable. Now, when you turn on the multiplexer, Wi-Fi connection will be established automatically. To make sure there is communication between multiplexer and laptop is possible in the selection of the multiplexer, click the “Test signal”:

SD-Connect-configuration-Road24h-mode-Setup-connection-11

2. SD Connect configuration Road24h mode for Windows 7.

2.1. Make the configuration of the laptop for the LAN connection.

The power supplied to the multiplexer and connected to the computer via LAN cable.

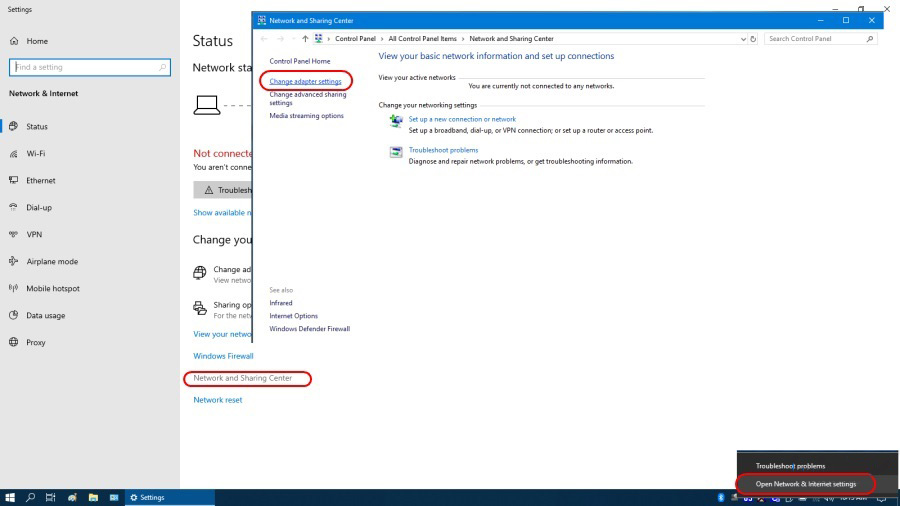
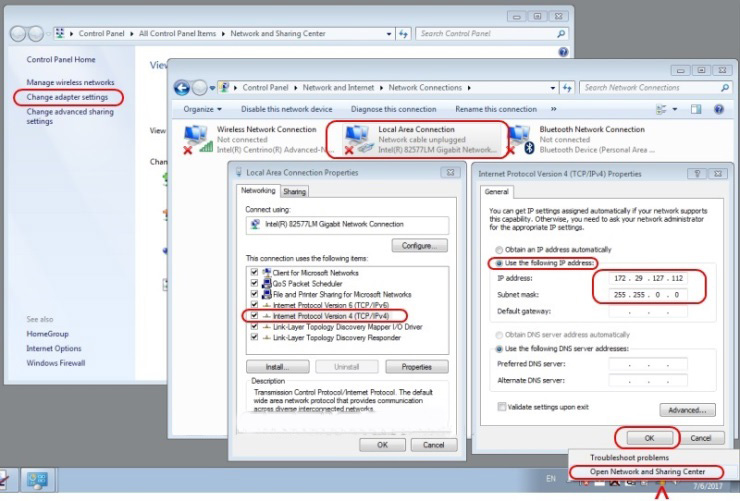
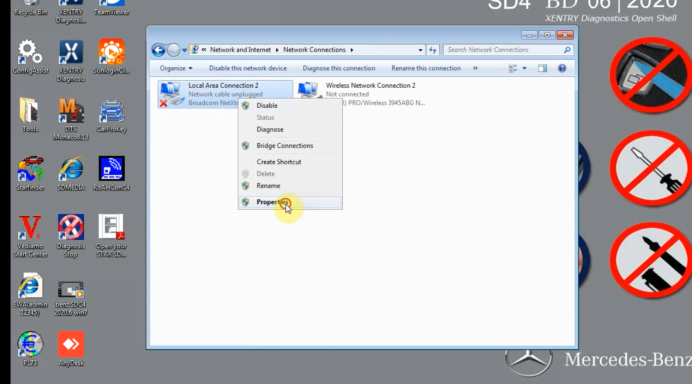
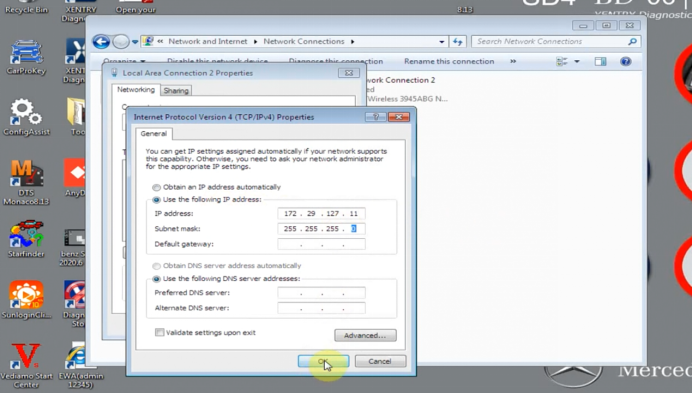
Go : control Panel/control Center network and sharing/Change adapter settings/local area Connection. Enter the LAN settings of the connection according to the picture :

SD-Connect-configuration-Road24h-mode-Setup-connection-12

Confirm all Windows with “OK”.

The connection cables are installed, which shows its icon in system tray:

SD-Connect-configuration-Road24h-mode-Setup-connection-13

2.2 Enter the settings of the wireless WiFi adapter in the computer.

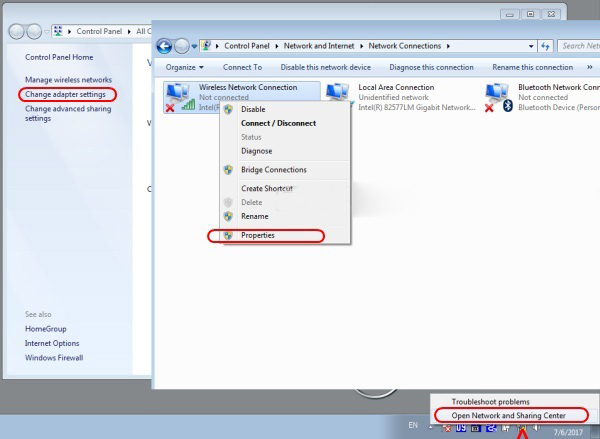
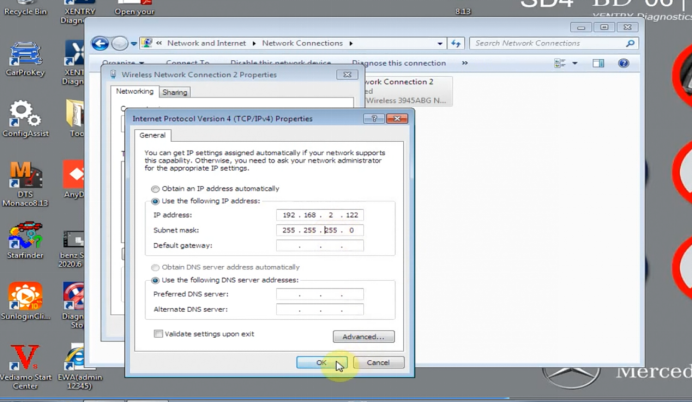
Go: control Panel/control Center network and sharing/Change adapter settings/Wireless network connection. Make settings according to the screenshot:

SD-Connect-configuration-Road24h-mode-Setup-connection-14
SD-Connect-configuration-Road24h-mode-Setup-connection-15

Confirm all Windows with “OK”. All the WiFi network settings entered in the computer.

2.3. Create network “Road24h” in the computer.

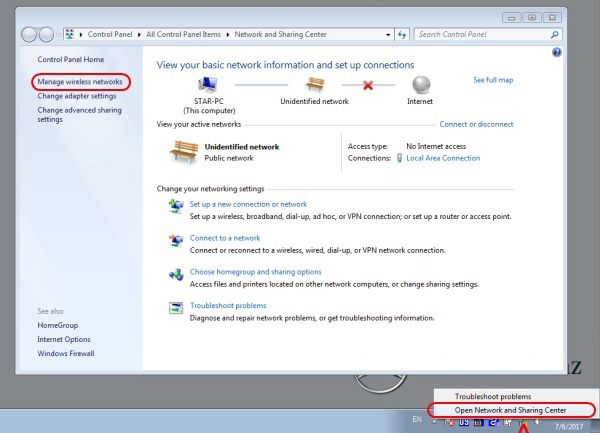
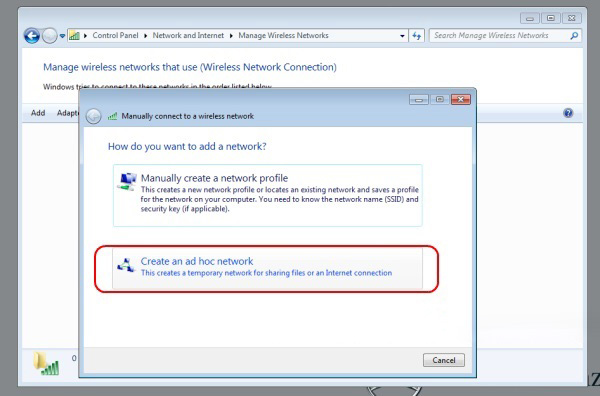
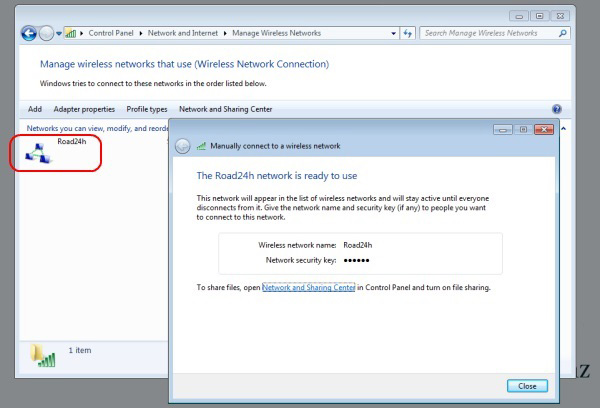
To do this, go to control Panel/control Center network and sharing/ Manage wireless networks/ Add / new connection computer — to-computer /next. Enter the data according to the screenshot. Do not forget to put a tick in the checkbox “Save settings for this network” :

SD-Connect-configuration-Road24h-mode-Setup-connection-16
SD-Connect-configuration-Road24h-mode-Setup-connection-17

SD-Connect-configuration-Road24h-mode-Setup-connection-18
Click “next”. Network “Road24h” created :

SD-Connect-configuration-Road24h-mode-Setup-connection-19

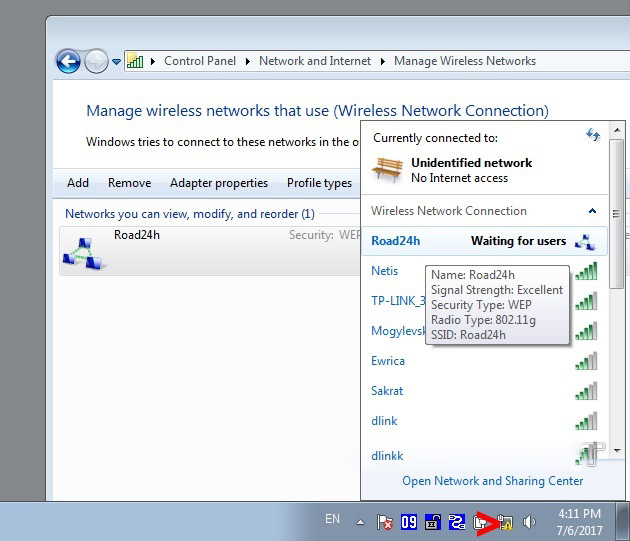
Close all Windows, check that the created network in the wireless networks list. Our established network must have the status “Waiting for connection” user :

SD-Connect-configuration-Road24h-mode-Setup-connection-20

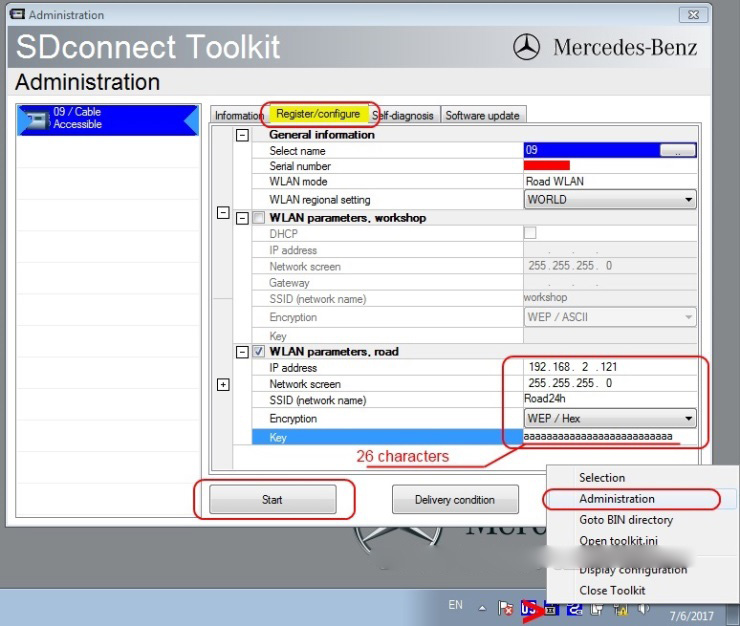
2.4. Next, enter the configuration settings for the WiFi connection in the multiplexer. Right-click in the system tray SDNC, in the context menu, choose “Administration”. In the opened window select the tab “Register/configure”. Enter settings according to the screenshot (the key is arbitrary, any 26 characters, the same like for computer settings) :

SD-Connect-configuration-Road24h-mode-Setup-connection-21

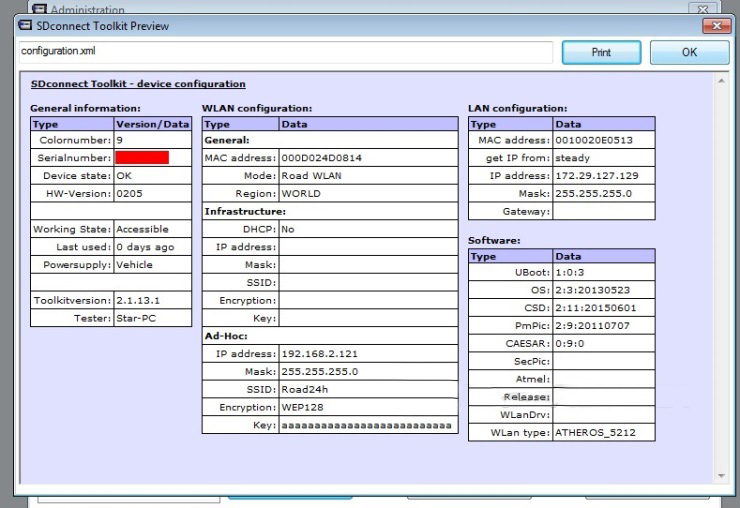
Click “Start”, the configuration is stored in the memory of the multiplexer, and as a result needs to obtain such a table :

SD-Connect-configuration-Road24h-mode-Setup-connection-22

The device is configured, close all Windows, LAN cable disconnected.

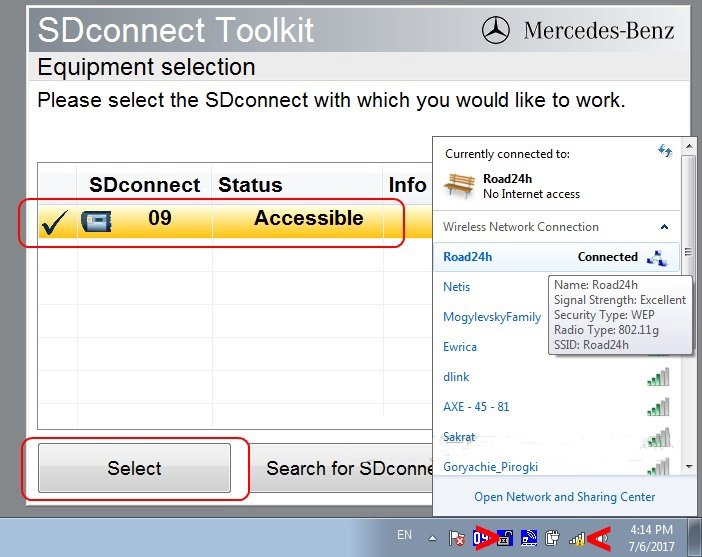
Then restart the multiplexer. During the boot process of the multiplexer, the WiFi connection between the computer and the device will be installed automatically. Its icon appears in the system tray SDNC. open the selection window of the multiplexer. Right-click in the system tray SDNC, in the context menu choose “Select”. In the opened window select your multiplexer and confirm “Select”:

SD-Connect-configuration-Road24h-mode-Setup-connection-23

In this procedure the connection setup multiplexer SD Connect to work with Xentry OpenShell program under Windows 7 is finished.

A diagnostic system is ready for operation.

Further, the inclusion of a diagnostic system should be as follows:

Turn on the computer, the operating system boots.
Check in the list of networks network status “Road24h”. Status should be “Waiting for connection” user, if not, click “Connect”, the network status is changed to required.
Then turn on the multiplexer. Connection via Wi-Fi network should be installed automatically.

Wednesday, July 21, 2021

How to Set up SDConnect “WORKSHOP” WiFi for Windows 8, 10.
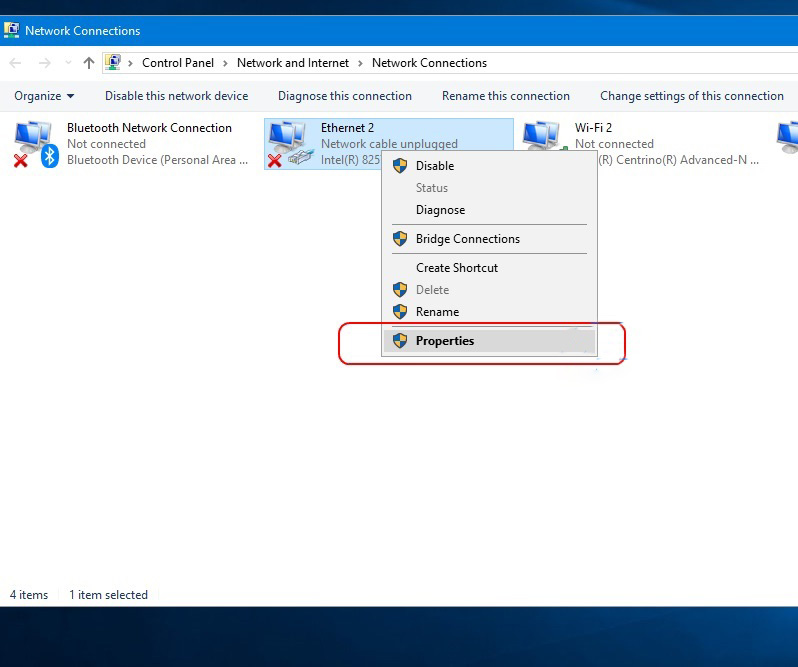
 

Windows 8 and Windows 10, unlike Windows 7, do not allow you to create a direct computer – to-computer (Road24) connection. However, it is possible to create an Ad-hoc “WORKSHOP” network between the computer and the SDConnect multiplexer in the command line mode.
Not all Wi-Fi adapters support this type of connection. This is why you first need to make sure that the laptop adapter allows you to create an Ad-hoc network.

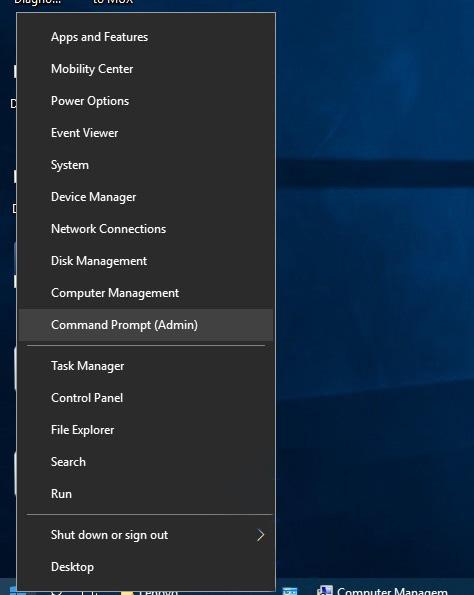
Open the command prompt as administrator: press Win+X, Command prompt (Admin).

Set-up-WiFi-connection-SDConnect-WORKSHOP-for-Windows-8-10-1

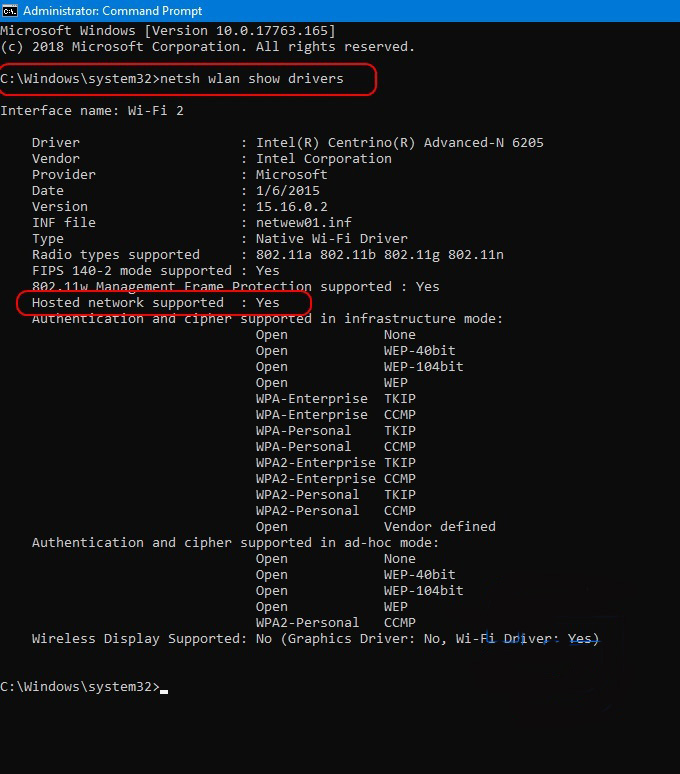
Enter the command netsh wlan show drivers and press enter. In the list that opens, look for the item “Hosted network supported”, which should have the parameter “Yes”.

Set-up-WiFi-connection-SDConnect-WORKSHOP-for-Windows-8-10-2

If this function has the “no” option, then either the wrong wifi adapter driver is installed, or this adapter does not support this type of connection.
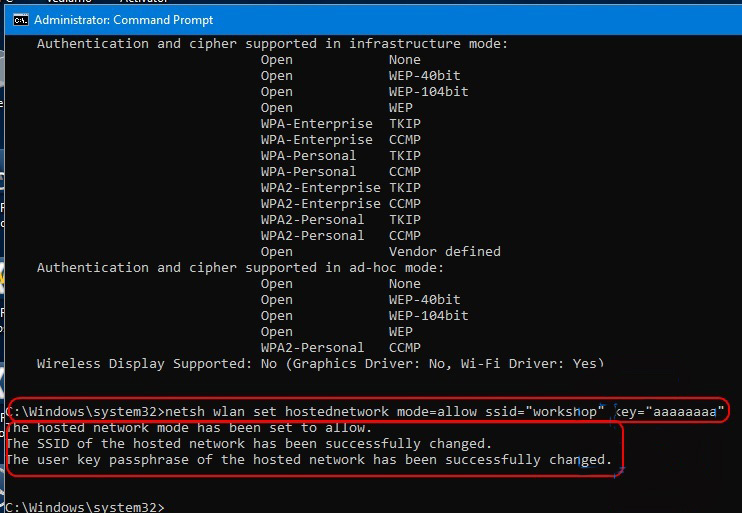
Next, create the network “workshop” with the command: netsh wlan set hostednetwork mode=allow ssid=”workshop” key=”aaaaaaaa”. Where “workshop” is the network name, “aaaaaaaa” is the password. The network is created.

Set-up-WiFi-connection-SDConnect-WORKSHOP-for-Windows-8-10-3

The network is created once. The command to create the network do not need more. In the future, only the commands to start and stop the network are used.
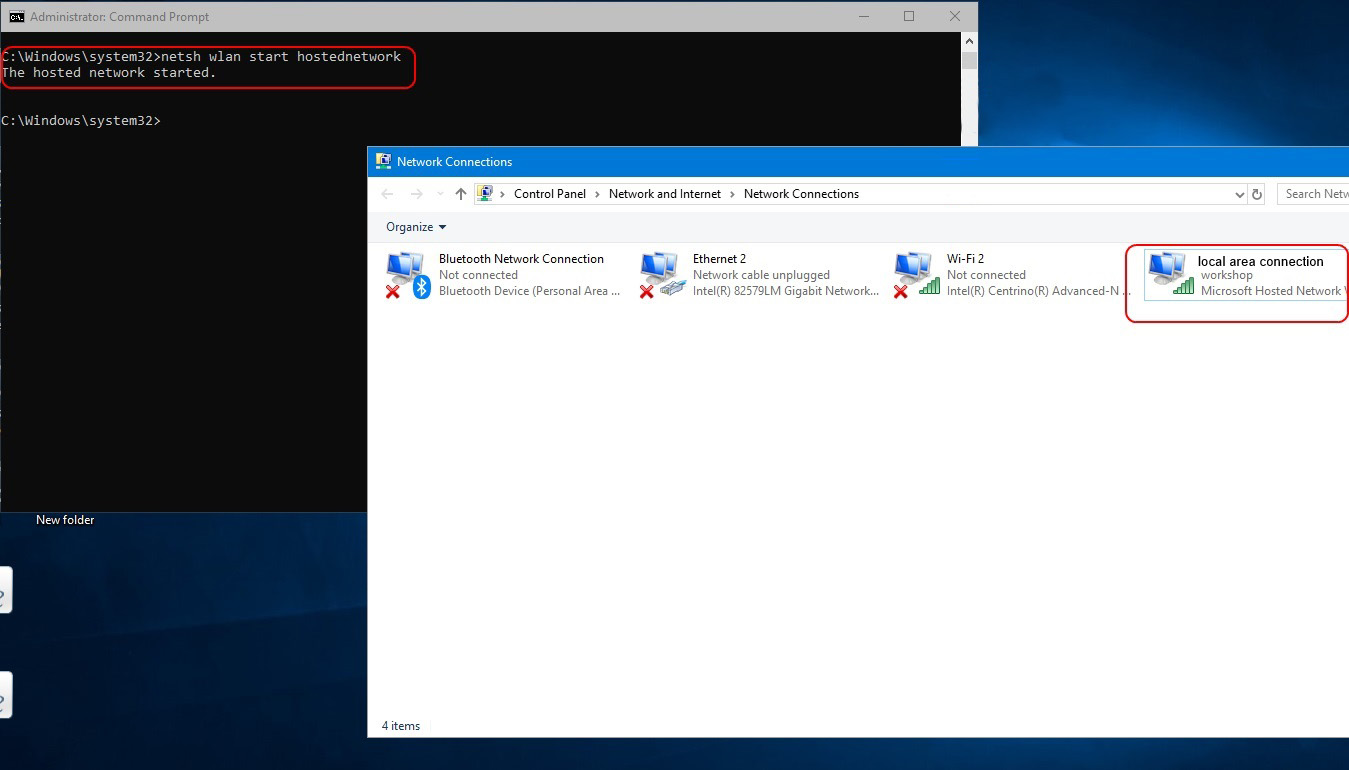
Start the network “workshop” command: netsh wlan start hostednetwork. The network is up.
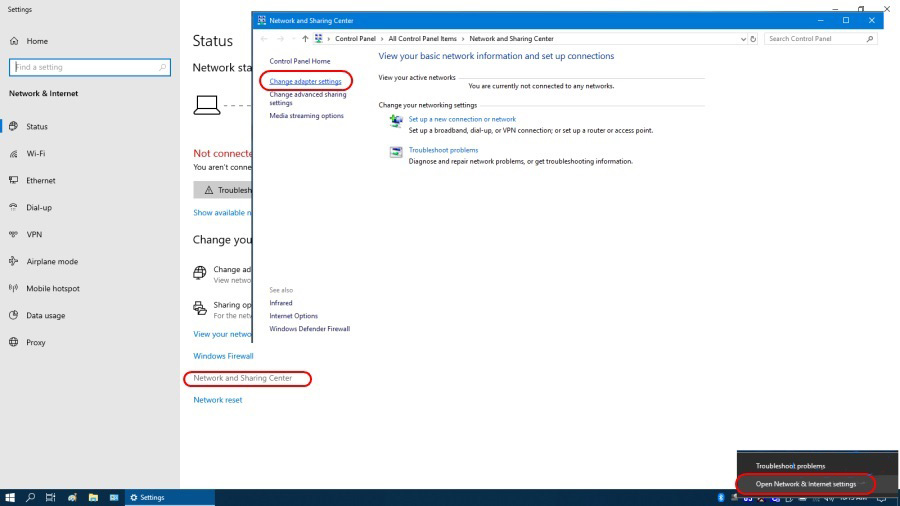
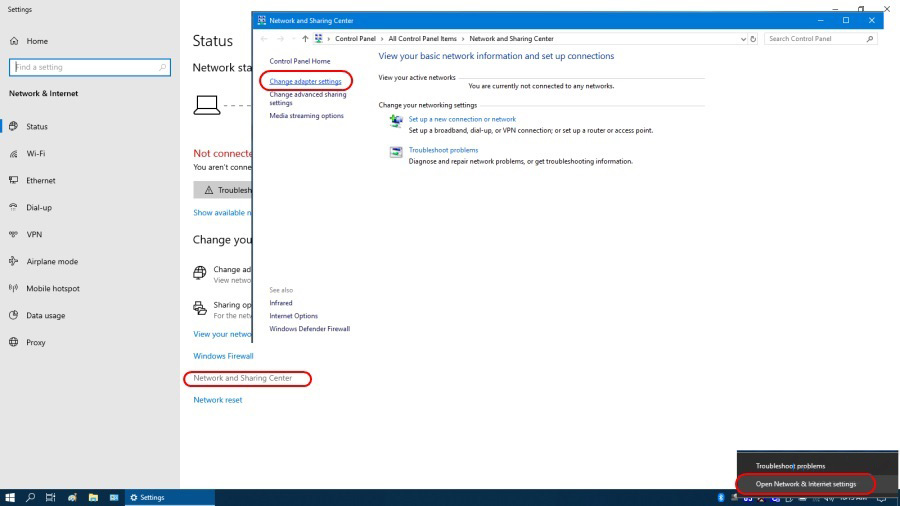
Open the folder “Network connections”. We see that there is a virtual adapter Local area connection **.

Set-up-WiFi-connection-SDConnect-WORKSHOP-for-Windows-8-10-4
Set-up-WiFi-connection-SDConnect-WORKSHOP-for-Windows-8-10-5

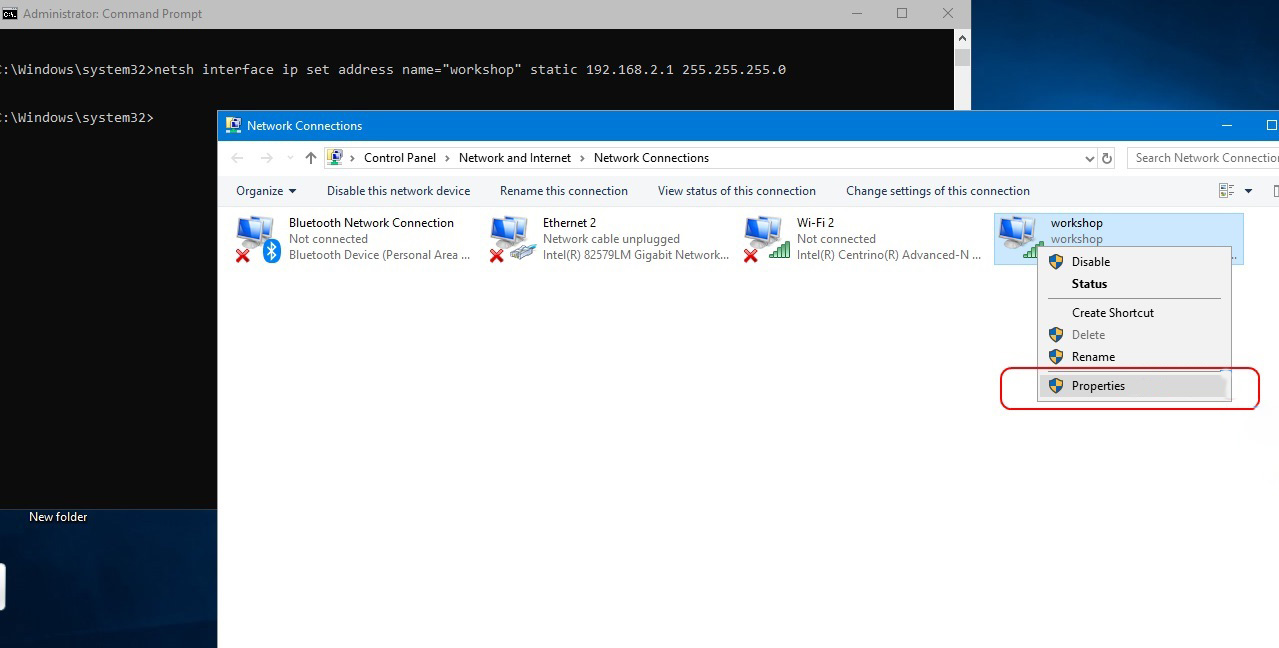
For convenience, it is desirable to rename the virtual adapter to “workshop”.

Set-up-WiFi-connection-SDConnect-WORKSHOP-for-Windows-8-10-6
Set-up-WiFi-connection-SDConnect-WORKSHOP-for-Windows-8-10-7

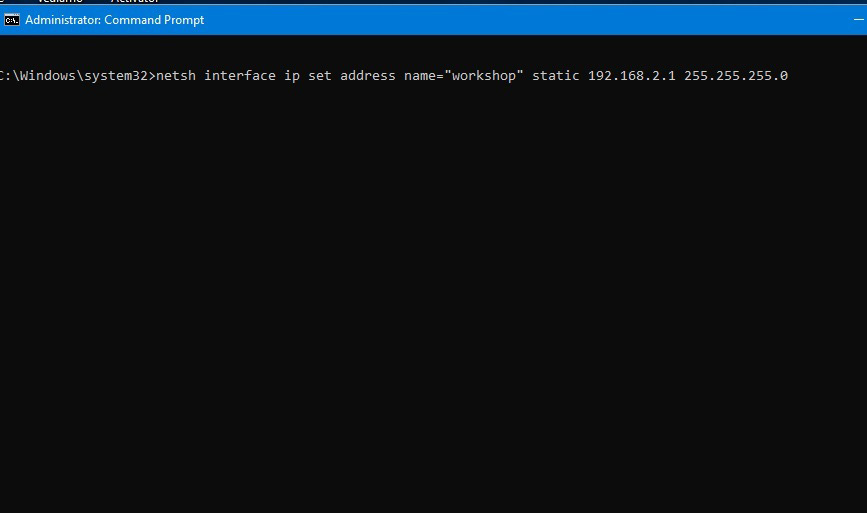
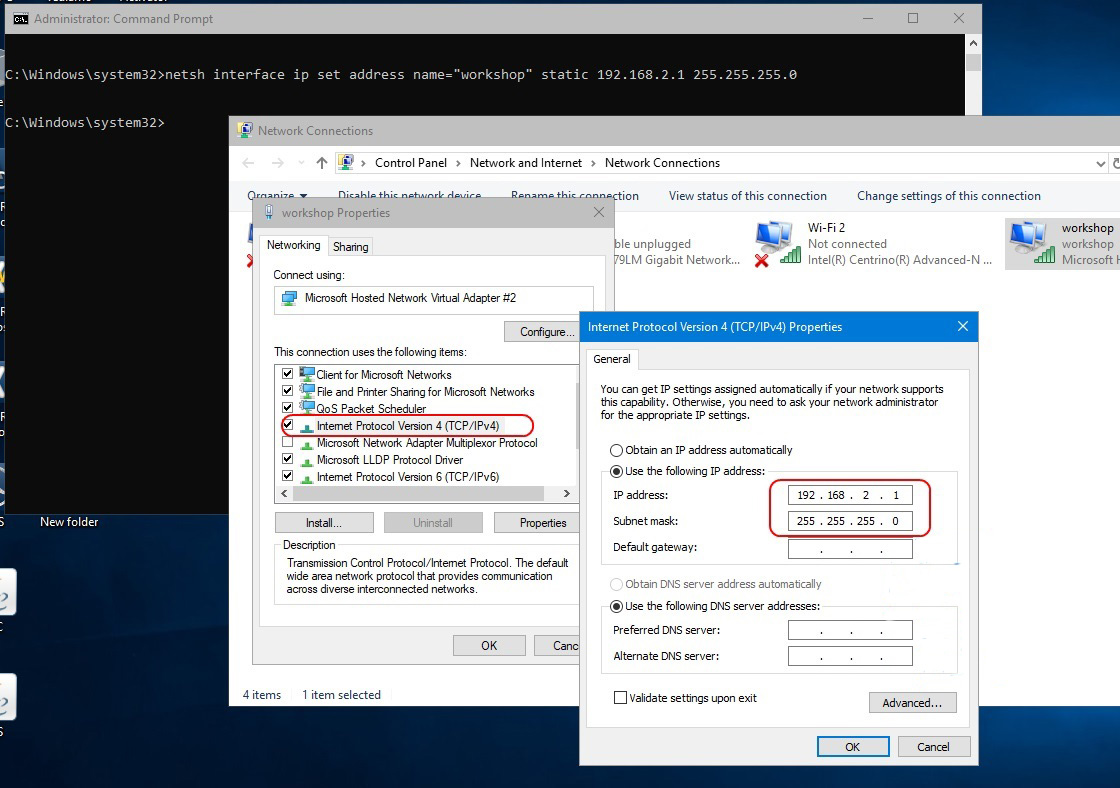
Next, you need to assign a static IP address and subnet mask to the virtual adapter. This is done with the command: netsh interface ip set address name=”workshop” static 192.168.2.1 255.255.255.0
Press enter. There should be no error message. Check if the adapter settings are saved in the adapter properties.

Set-up-WiFi-connection-SDConnect-WORKSHOP-for-Windows-8-10-8
Set-up-WiFi-connection-SDConnect-WORKSHOP-for-Windows-8-10-9
Set-up-WiFi-connection-SDConnect-WORKSHOP-for-Windows-8-10-10

At this point, the virtual network adapter configuration is complete and the laptop is waiting for the SD Connect C4 multiplexer to connect.
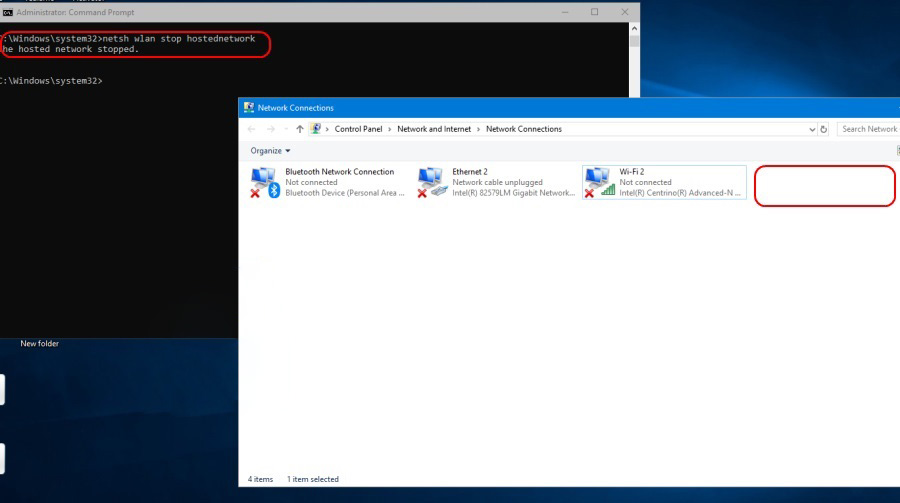
To stop the network, use the command: netsh wlan stop hostednetwork. The virtual adapter disappears in the Network connections folder .

Set-up-WiFi-connection-SDConnect-WORKSHOP-for-Windows-8-10-11

For convenience, so as not to enter commands manually, you can create bat files with the appropriate commands. Files are created in any text editor with any name. After that, its are assigned the extension bat.

The network creation file has the following contents:
netsh wlan set hostednetwork mode=allow ssid=”workshop” key=”aaaaaaaa”

The startup file of the network and assign an IP address:
netsh wlan start hostednetwork
netsh interface ip set address name=”workshop” static 192.168.2.1 255.255.255.0

Network stop file:
netsh wlan stop hostednetwork

The network creation file is used only once. Network start and stop files can be conveniently located on the desktop.

Next, you need to configure the SD Connect multiplexer.

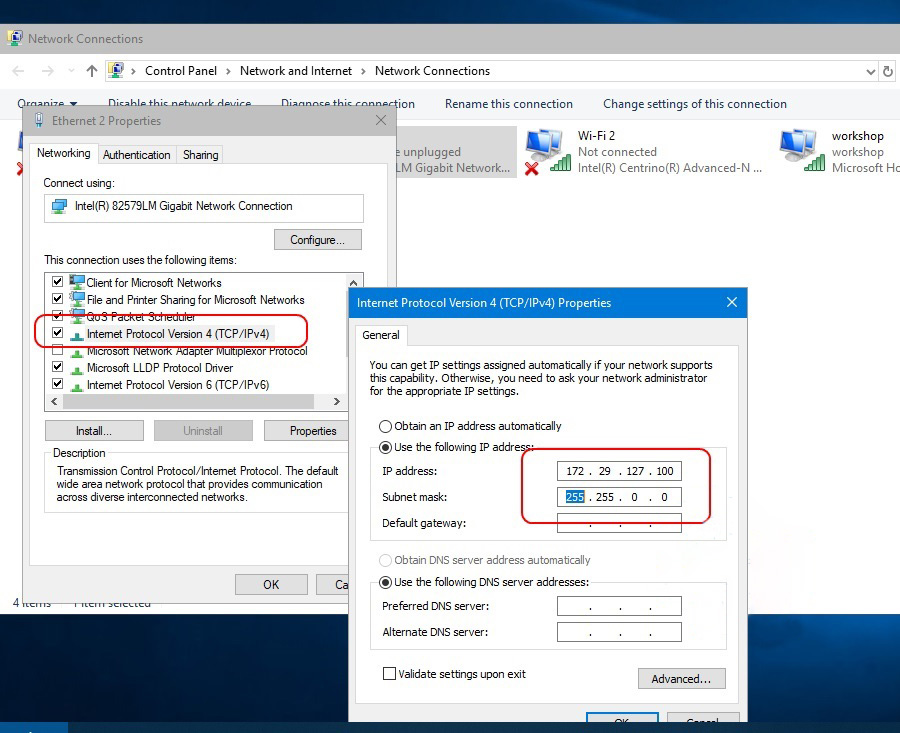
Connect the multiplexer to the laptop by cable. The lan adapter settings must already be installed.

Set-up-WiFi-connection-SDConnect-WORKSHOP-for-Windows-8-10-12
Set-up-WiFi-connection-SDConnect-WORKSHOP-for-Windows-8-10-13

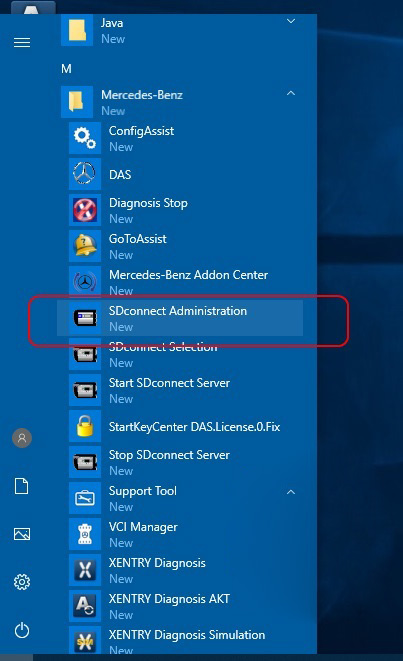
Run” SDConnect Administration”.

Set-up-WiFi-connection-SDConnect-WORKSHOP-for-Windows-8-10-14

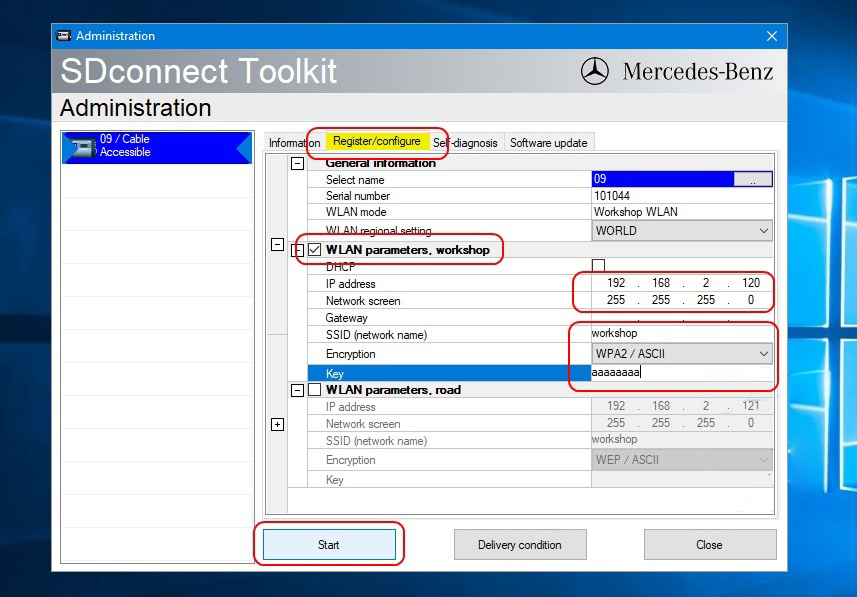
Go to the tab “Registration/configuration”. Enter the data according to the screenshot and click Start

Set-up-WiFi-connection-SDConnect-WORKSHOP-for-Windows-8-10-15
Set-up-WiFi-connection-SDConnect-WORKSHOP-for-Windows-8-10-16

The multiplexer configuration is complete.

If the multiplexer has already been configured mode Road24h, now added the second mode is a “workshop” and have the opportunity to switch modes wireless connection. On the multiplexer, the switching of wireless connection modes is performed by the buttons of the display panel.

In the ” workshop” mode , constantly flashing, red led means that the device is waiting for connection with the laptop. As soon as you run the bat file “network start” on the laptop, the connection will be established automatically and the led will stop flashing. The order of starting the network in the laptop and turning on the multiplexer in the ” workshop” mode does not matter.

Stopping the network is performed as a bat file. In this case, the multiplexer again goes into the network connection wait.

Tuesday, July 20, 2021

Super MB Pro M6 Benz Diagnostic Tool Review


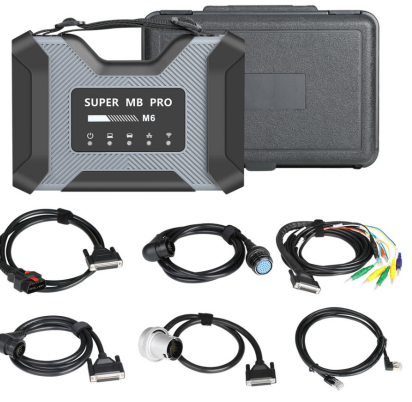
SUPER MB PRO M6 is new released mb star diagnsotic tool, it can support original Benz dealer diagnostic software, update firmware without installing the battery, also support Mercedes-Benz models, covering 12v car, 24v diesel truck & bus, MPV, etc. Moreover, it’s adopts the framework concept of original C6 diagnostic tool, perfectly replace normal MB SD C4/C5. It’s better to work with the original manufacturer software, It can work with V2021.6 SSD or V2021.6 HDD .

Super-MB-Pro-M6-Benz-Diagnostic-Tool-Review-1

Super MB Pro M6 Features:

1.ABS+PVT plastic structure adoption
1) Impact-proof & easy to carry
2) Lower consumption on product shell against wireless signal
3) Great advancement of wireless communication distance & stability

2. Built-in network interface prevents deformation and damage from impact.

3.It is the only diagnostic tool on the market that is highly consistent with the original MB Star C6:
1) Fully compatible with the original software.
2) You can directly upgrade the newest firmware without installing additional driver.

4.Compatible with the Mercedes Benz models with protocol DOIP, K-line, CAN Low, Can High, LIN, RS485, etc, works with the old cars and new cars.

Monday, July 19, 2021

WLAN Settings Tutorial for C4 / C5 Doip Plus & SD C4 / C5

This article explains in detail how to set up a Wlan connection for both DOIP SD C4 / C5 Doip Plus and SD C4 / C5, which provides great help for many users who use the tools for the first time. Generally speaking, the Wlan connection setting method of C4 / C5 Doip Plus is much simpler than that of SD C4 / C5.

Part 1. How to set up Wlan connection for Mercedes Star MB SD C4 / C5 Doip Plus?

Part 2. How to set up Wlan connection for old SD C4/C5?

Part 1. How to set up Wlan connection for MB SD C4 / C5 Doip Plus?

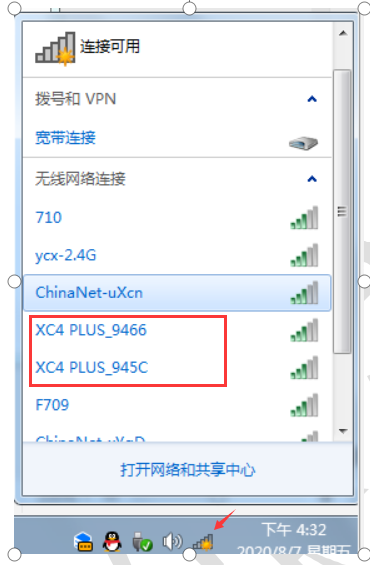
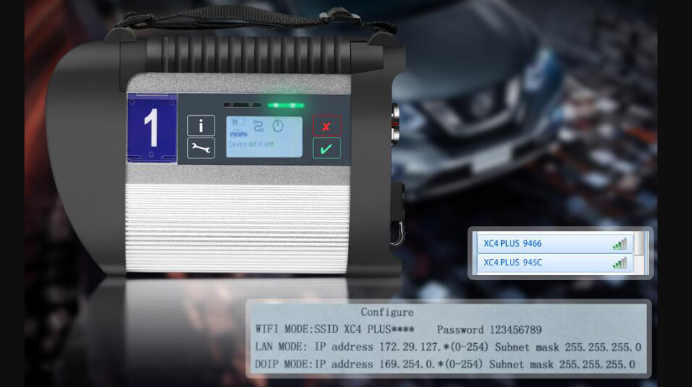
Firstly, to do IP Setting for LAN, then open Local Area Connection on task bar to find the available WIFI name of C4 or C5 Doip.

How-to-set-up-Wlan-connection-for-MB-SD-C4-C5-Doip-Plus-1

Select the correct one to connect, enter wifi password “123456789“, please set auto obtain IP.

How-to-set-up-Wlan-connection-for-MB-SD-C4-C5-Doip-Plus-2

SD C4/C5 DoIP Plus wireless setting is done.

Part 2. How to set up Wlan connection for old SD C4/C5?

Step 1. Set IP for LAN, local Area Connection

How-to-set-up-Wlan-connection-for-old-SD-C4-C5-1
How-to-set-up-Wlan-connection-for-old-SD-C4-C5-2

Step 2. Set wireless IP

How-to-set-up-Wlan-connection-for-old-SD-C4-C5-3
How-to-set-up-Wlan-connection-for-old-SD-C4-C5-4

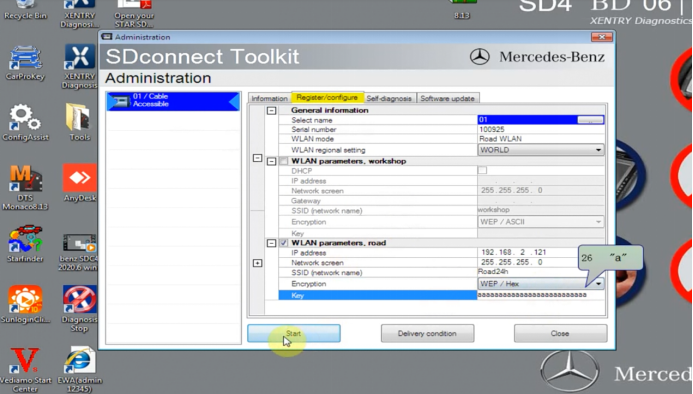
Step 3. Connect MB SD C4/C5 device to PC, open the “Administrator” of C4/C5, to set as required by following below information.

How-to-set-up-Wlan-connection-for-old-SD-C4-C5-5

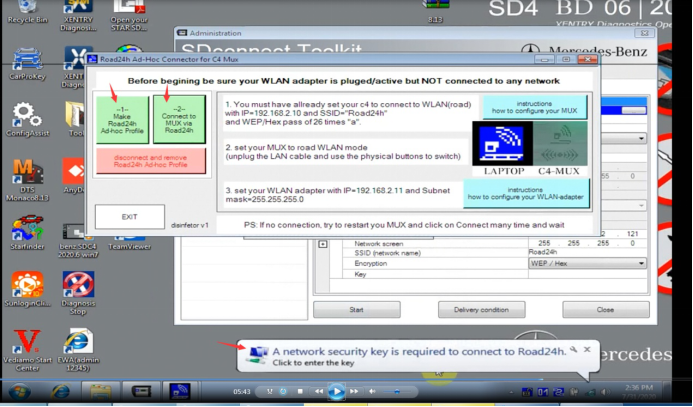
Step 4.Open Road24h Ad-Hoc Connector for C4 Mux

How-to-set-up-Wlan-connection-for-old-SD-C4-C5-6

Click –1– Make Road24h Ad-hoc Profile and –2– Connect to MUX via Road24h step by step.
How-to-set-up-Wlan-connection-for-old-SD-C4-C5-7

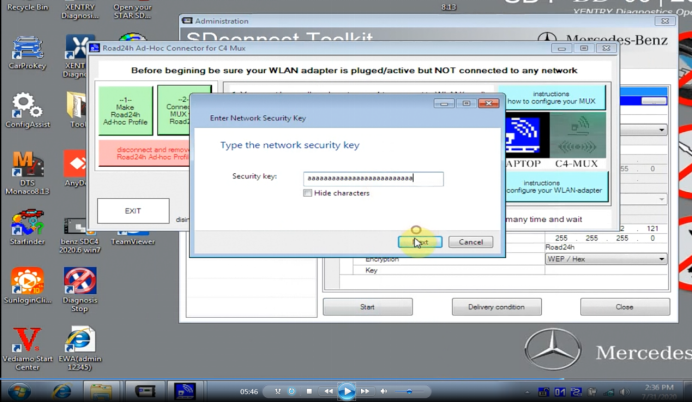
Step 5.Enter security key

Step 6. Disconnect the sd c4/c5 device, but don’t turn off the power.

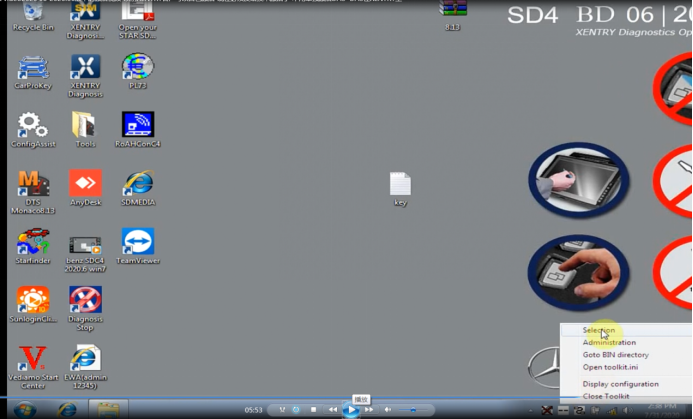
Step 7. Select “Selection” option on task bar.
How-to-set-up-Wlan-connection-for-old-SD-C4-C5-8
How-to-set-up-Wlan-connection-for-old-SD-C4-C5-9

Step 8. Select the SD connect after opening the administrator.

WLAN setting is done!
How-to-set-up-Wlan-connection-for-old-SD-C4-C5-10