Showing posts with label MB SD C4. Show all posts

Saturday, April 23, 2022

How to Change Xentry 2021-12 App ID from 253 to 252 and Hide VM

How-To: Install MB Star Diagnostic SD Connect C4 Xentry 2021-12 on Virtual Machine and change App ID From 253 to 252.

Firstly, a huge thanks to @webmaster, @gcs190, @pesona, @connector, @disinfetor, @cloud9atom, and many others who have helped us learn.

HOW TO: Change Xentry App ID From 253 to 252 and Hide Virtual Machine
WHAT THIS FIXES: “No Access Authorization” on accepted Startkey, or Config Assist not accepting long key or short key StartKeys
*   Go to your virtual image folder
*   open notepad (Windows Key + R, “notepad“, enter.)
*   Drag and drop your .vmx file for the image into notepad
*   Add the following line at the end of the file: monitor_control.restrict_backdoor = “true”
*   Save and close
*   Open your Virtual Machine, goto to Xentry Config Assist et voila – your App ID is now 252!. You have prevented Xentry from detecting it is running inside a Virtual Machine

HOW TO: Properly Uninstall Old Versions of Xentry
WHAT THIS FIXES: Too many tools installed that are not compatible with each other. If Everything is a mess and you are unhappy
*  Uninstall Xentry: Remove any old versions of Xentry through the windows uninstaller
*  Clean up any old patches: by deleting Xentryapi.dll and/or Connector64.dll from C:\windows\syswow64 , C:\windows, C:\windows\system32 if exists
*  Clean up registry: Windows+R key, “regedit”, enter. Navigate to HKEY_LOCAL_MACHINE\SOFTWARE\Microsoft\Windows NT\CurrentVersion\Windows and delete AppInit_DLLs and LoadAppInit_DLLs keys (they may have pointed to or referenced XentryAPI.dll or Connector64.dll)
*  Clean up the previous keyguard: Navigate to C:\programdata\LicDir and make sure lic_key_2.dat is NOT set to Read-Only (right-click, properties on file). Delete lic_key_2.x4711 if it exists

HOW TO: Installing Xentry XPT 2021-12 in Virtual Machine VM:
WHAT THIS FIXES: Hopefully a Mercedes !!
*  If Not in VM: Disable Secure Boot in Bios
*  If In VM: Modify VMX file as per above instructions (can be done anytime prior to using keygen)
*  Download XPT or Xentry Files
*  Install
*  Run Fullfix v4 by @disinfetor in Administrator Mode (right-click the icon, run as admin)
*  Restart PC
*  Open Config Center, click next until Start Key Screen. Click Copy ID Button
*  Right-click and Run as admin XentryKGdisMod – if given .dll not found error hit ok. Key will appear
*  Go back to Config Center Screen, click manual, then paste using CTRL-V. Hit ok
*  Choose your storage options (Deactivated etc.)
That’s it – you should now be able to start without “No Access Authorization”, No “2221-45 Error”, and No Login Screen all thanks to the work of multiple people on mhhauto forum and the disinfetor package!

Free download FullFix-Xentry-2021-12 v3

https://mega.nz/file/I4ZwGDJY#tcPmtlJmiFFzh8B-1AQvXK9-FI8L71LgN4yW2VYFTa8

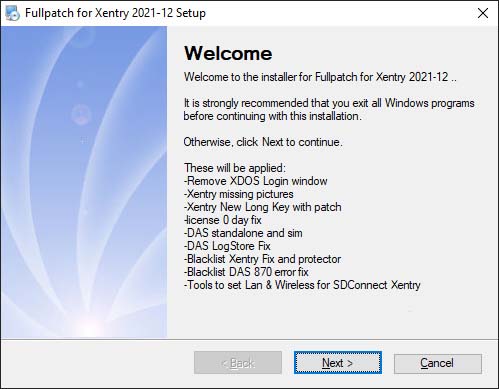
These will be applied:
-Remove XDOS Login window
-Xentry missing pictures
-Xentry New Long Key with patch
-license 0 day fix -DAS standalone and sim
-DAS LogStore Fix
-Blacklist Xentry Fix and protector
-Blacklist DAS 870 error fix
-Tools to set Lan & Wireless for SDConnect
How-to-Change-Xentry-2021-12-App-ID-from-253-to-252-and-Hide-VM

Please dissable antivirus. As it detects false positives.

changelog:
v4: fixed shortcut to the keygen.
v3: new modded xentry keygen with dll-patch and secureboot checker
v2: New modded keygen of xentry. Copy hwid to clipboard and run. The clipboard will be replaced with the key to be pased in xentry.

Wednesday, March 23, 2022

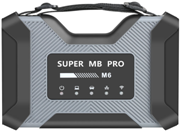
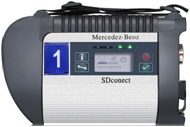
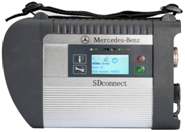
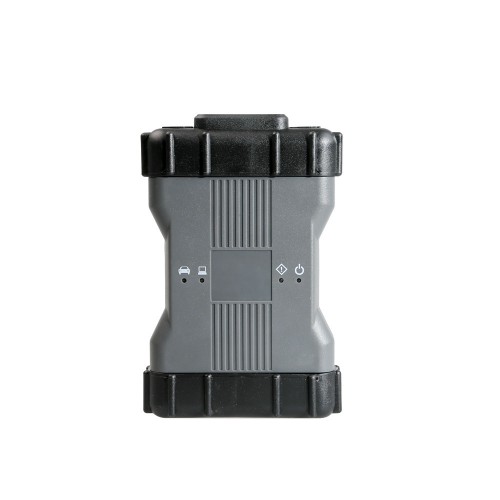
Super MB Pro M6 vs. MB SD C4 vs. SD C4 DoIP vs. OEM MB C6

SUPER MB PRO M6 (SD C4/C5) compatible with Original Benz Dealer Diagnostic Software, can work on Both Cars and Trucks, Mercedes-Benz models covering 12v car, 24v diesel truck & bus, MPV etc, supports firmware update without installing the battery.

Comparison table: Super MB Pro M6 vs. MB SD C4 vs. SD C4 DoIP vs. OEM MB C6


Super MB Pro M6 MB SDConnect C4 Plus DoIP MB SD Connect C4
OEM MB Star C6
Image


Super-MB-Pro-M6-vs-MB-SD-C4-vs-SD-C4-DoIP-vs-OEM-MB-C6-1 Super-MB-Pro-M6-vs-MB-SD-C4-vs-SD-C4-DoIP-vs-OEM-MB-C6-2 Super-MB-Pro-M6-vs-MB-SD-C4-vs-SD-C4-DoIP-vs-OEM-MB-C6-3 Super-MB-Pro-M6-vs-MB-SD-C4-vs-SD-C4-DoIP-vs-OEM-MB-C6-4
Full-system diagnosis Yes Yes Yes Yes
Online Programming Yes Yes Yes Yes
Offline Programming Yes Yes Yes NO
Activate some hidden functions Yes Yes Yes Yes
Service reset Yes Yes Yes Yes
Xentry Yes Yes Yes Yes
DAS Yes Yes Yes Yes
HHTWIN Yes Yes Yes Yes
EPC Yes Yes Yes Yes
WIS Yes Yes Yes Yes
Vediamo Yes Yes Yes NO
DTS Monaco YES YES YES YES
Star Finder YES YES YES YES
PL73 YES YES YES YES
SDmedia YES YES YES YES
Doip YES YES NO YES
Truck/BUS YES YES YES Partial
Firmware Update YES YES YES (Need to install batteries) YES
Wire Direct connection Direct connection Point to point Direct connection
wireless LAN LAN LAN LAN/usb Cable
Software Version 2021.06 2021.06 2021.06 2021.06
Hardware Version OS:2.3, CSD:2.11 OS:2.3, CSD:2.11 OS:2.3, CSD:2.11 1.84
Heat dissipation Heat sink + fan Heat sink NO NO
Software Language

(Can switch

directly)

English, Bulgarian, Danish, Greek, Spanish, French, Italian, Korean, Polish, Romanuan, Serbo-Croatian, Turkish, Czech, German, Finish, Hyngarian, Japanese, Dutch, Portuguese, Russian, Swedish, Chinese

Sunday, February 20, 2022

How to reflash MB SD C4 Plus without battery

How to reflash MB SD C4 Plus without battery? You can edit Toolkit.ini to change the value of MinUpdateVoltageVbatt and MinUpdateVoltageVExt, and update the related files.

Step 1: Change MinUpdateVoltageVbatt/VExt Value
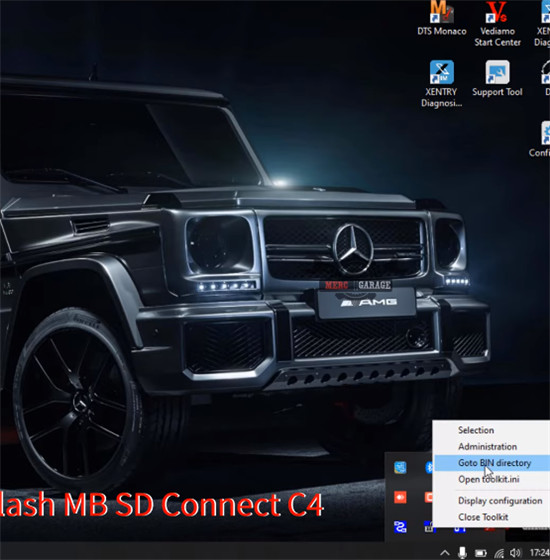
Right click the corresponding icon
Select ‘Goto BIN directory’

How-to-reflash-MB-SD-C4-Plus-without-battery-1

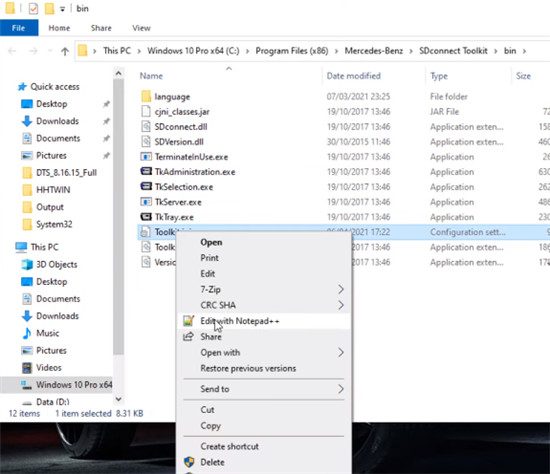
Then right click ‘Toolkit.ini’ and select ‘Editwith Notepad++’

How-to-reflash-MB-SD-C4-Plus-without-battery-2

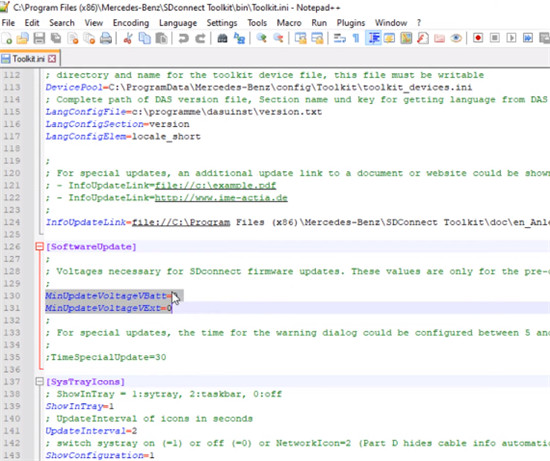
You can see MinUpdateVoltageVbatt=7200 and MinUpdateVoltageVExt=11000.
Change these two values to 0
i.e MinUpdateVoltageVbatt=0
MinUpdateVoltageVExt=0

How-to-reflash-MB-SD-C4-Plus-without-battery-3

Remember to reboot the computer after changing.
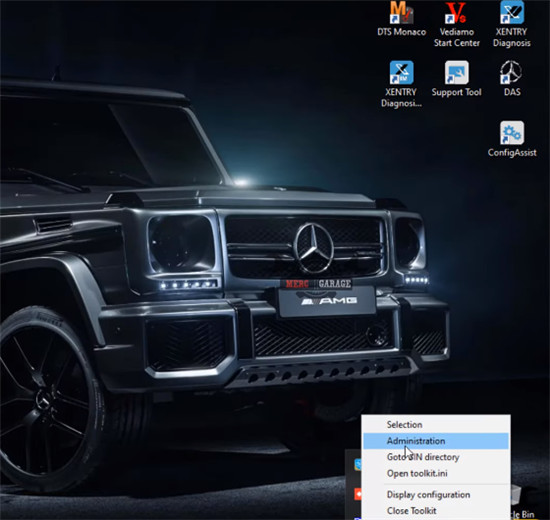
Open ‘Administration’
How-to-reflash-MB-SD-C4-Plus-without-battery-4

It shows ‘the toolkit is being initialized.’

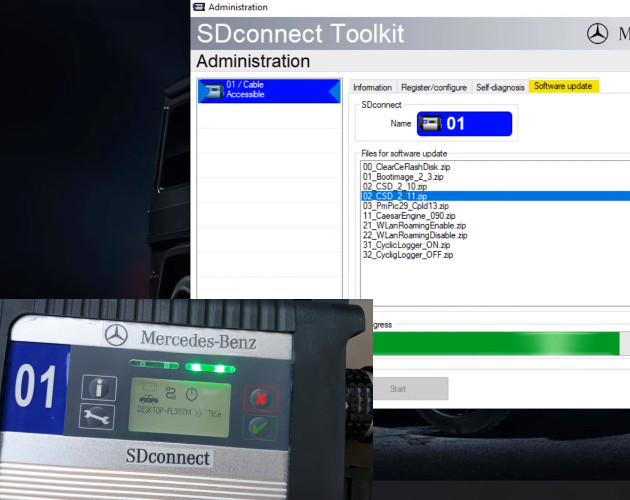
Step 2: Update 02 CSD_2_11.zip
Click 01/Cable Accessible>> Software update>> 02 CSD_2_11.zip>> Start
It will take approx 2 min to update the software.
The indicators light up during the process.
Update SDconnect software successfully

How-to-reflash-MB-SD-C4-Plus-without-battery-5

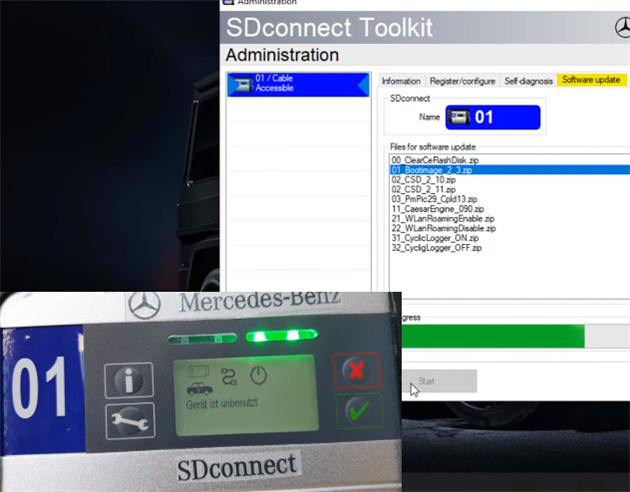
Step 3: Update 01_Bootimage_2_3.zip
Click 01/Cable Accessible>> Software update>> 01_Bootimage_2_3.zip>> Start
It also takes approx 2 min to update.

How-to-reflash-MB-SD-C4-Plus-without-battery-6

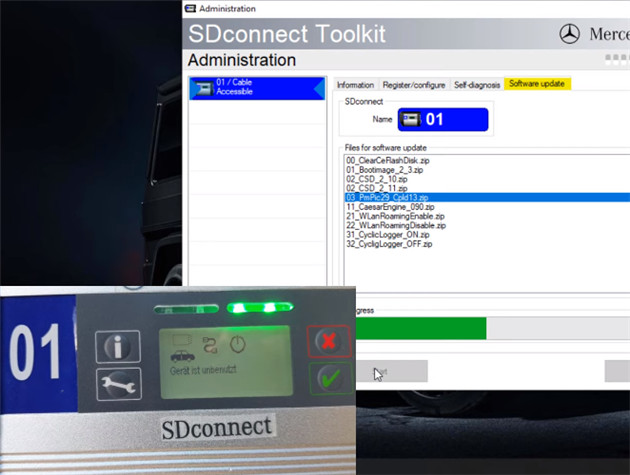
Step 4: Update 03_PmPic29_Cpld13.zip
Click 01/Cable Accessible>> Software update>> 03_PmPic29_Cpld13.zip>> Start
It also takes approx 2 min to update.

How-to-reflash-MB-SD-C4-Plus-without-battery-7

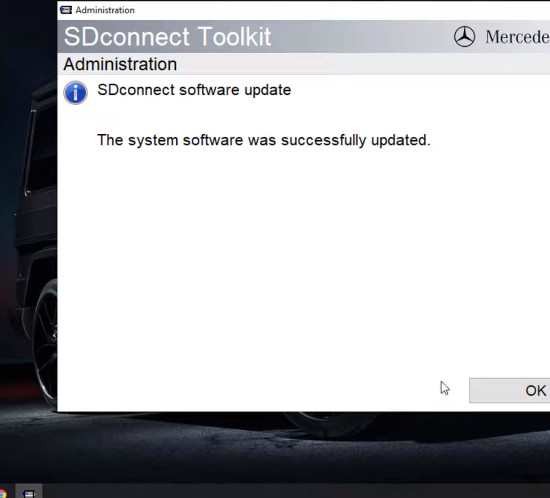
Update is completed.

How-to-reflash-MB-SD-C4-Plus-without-battery-8

Hope it helps!

Wednesday, November 24, 2021

How to Setup the DOIP of MB SD C4 Diagnostic Tool

Newest update V2021.09 MB SD C4 Plus supports mercedes benz cars and trucks till year 2020. MB SD Connect C4 diagnostic tool support doip, with free engineer software DTS Monaco Vediamo, software update via hdd.

SD C4 Plus support DoIP already come into market for a while. The new SD C4 DoIP is able to work for MB cars with DoIP. It’s the only C4 that supports Ethernet communication (DoIP) at the moment. VXDAS here would like to share the configuration procedure for C4 DoIP set up.

This article is available with the tool, MB SD C4 Plus, on its DOIP Setup User Guide for customers.

How-to-Setup-the-DOIP-of-MB-SD-C4-Diagnostic-Tool-1
Let’s get started with it.

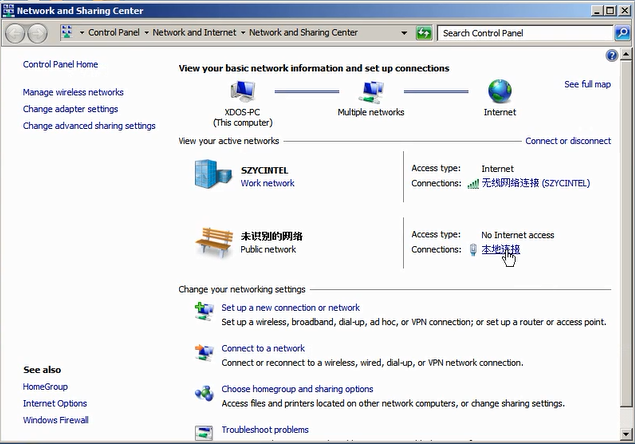
1.Open Local Connection of your PC

How-to-Setup-the-DOIP-of-MB-SD-C4-Diagnostic-Tool-2
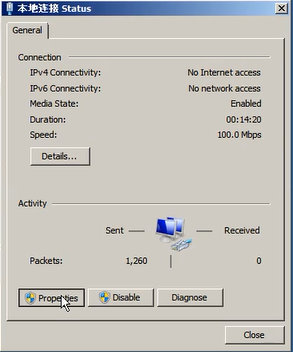
2.Click Propertities

How-to-Setup-the-DOIP-of-MB-SD-C4-Diagnostic-Tool-3

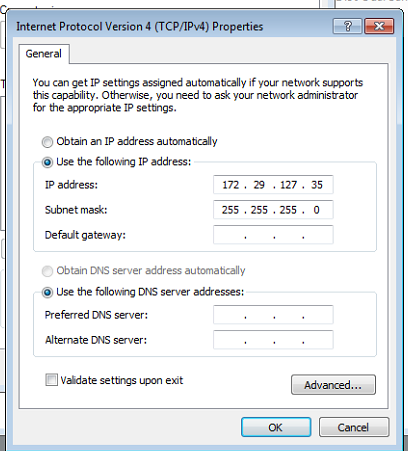
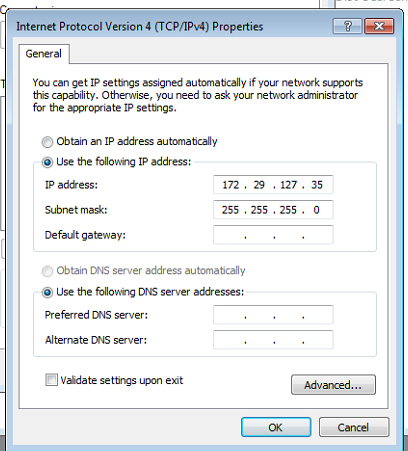
3.Click on “Internet Protocol Version 4(TCP/IPV4) and make settings

4.Set the IP address 172.29.127.35

How-to-Setup-the-DOIP-of-MB-SD-C4-Diagnostic-Tool-5
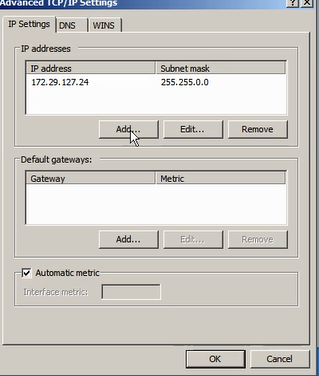
5.Choose Advanced and tick the “Use the following IP address”.

How-to-Setup-the-DOIP-of-MB-SD-C4-Diagnostic-Tool-6

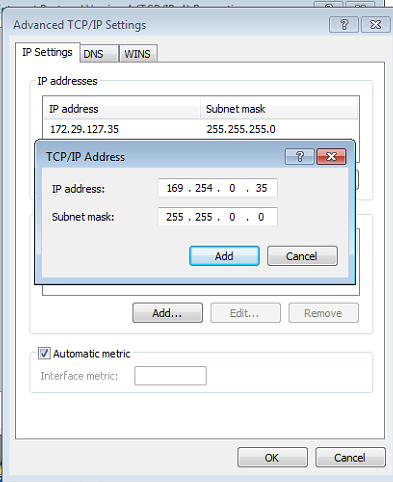
6.Click Add, Set Doip IP Address

How-to-Setup-the-DOIP-of-MB-SD-C4-Diagnostic-Tool-7

7.Set the IP to 169.254.0.35

How-to-Setup-the-DOIP-of-MB-SD-C4-Diagnostic-Tool-8

8.Click on Add, click on OK to finish the settings

Awesome, this tool is ready to be used perfectly on your cars.

Tuesday, November 9, 2021

How to change SDconnect IP for Das fault (1.1) -1.501.9878


How-to-change-SDconnect-IP-for-Das-fault-(1.1)--1.501.9878

SD connect C4 fails to connect and comes up with the error message:

Das fault (1.1) -1.501.9878

The mux is connecting, with diagnosis computer both by lan cable or wifi ( passed and respond to all self tests), no lcd problems or blocked (!) . The fault comes when das try to initialize the mux green led blinks about 10 sec,and this fault comes no matter is from das standalone or launched from xentry.
Software & install:

xentry 12.2015 , das bin, blacklist fixed etc on a dell d630 appid 253 and ……

Solutions:

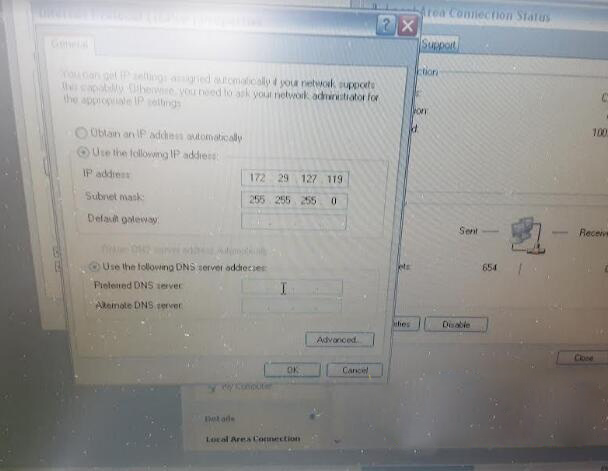
You must change IP address in windows.172.29.127.119:

Go into “Control Panel”, “Network Connection”, “Local Network Connection”> right click > properties > choose this one with TCP/IP, select this, chose properties, choose manually ip, and put this ip “172.29.127.119”, mask 255.255.0.0 (as you will get when type ip), rest of field, leave blank.
if it does not work

Try one more time make update of these 2 package.

Tuesday, October 12, 2021

How to Upgrade MB SD C4 C5 Diagnostic Tools Hardware


MB Star Diagnostic Tools have two versions like 2020.03 MB SD C4 and V2021.6 MB SD C5 now for their Hardware Upgrade Instructions.

MB SD Connect Compact 5 diagnostic tool has same function as SD C4 but with new design, support both cars and trucks, support wireless connection.

How-to-Upgrade-MB-SD-C4-C5-Diagnostic-Tools-Hardware-1

While 2020.03 MB SD C4 diagnostic tool is still great Connect Compact 4 For Mercedes Benz Diagnosis WIFI Version, both compatible on WIN7 and WIN10.

How-to-Upgrade-MB-SD-C4-C5-Diagnostic-Tools-Hardware-2

For their hardware upgrade, there are two paths available:

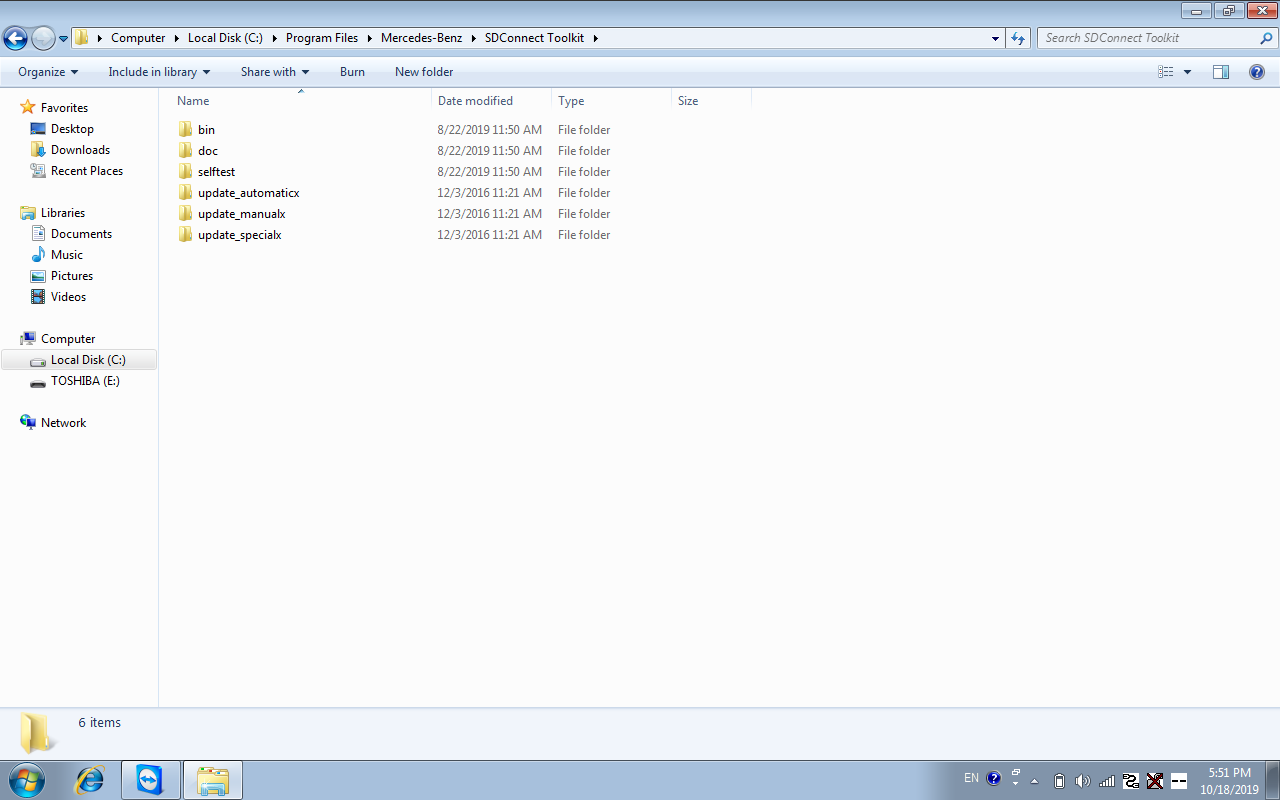
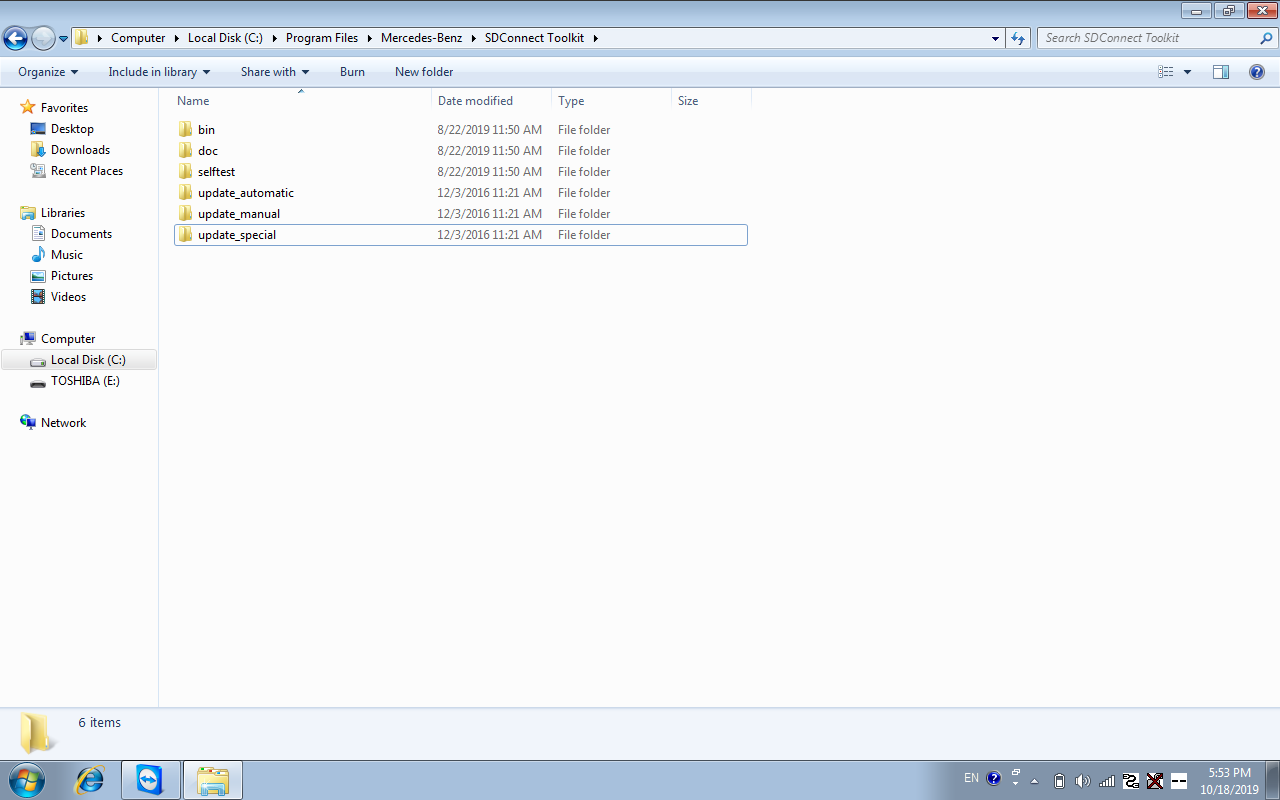
(1)Path one:C:\Program Files\Mercedes-Benz\SDConnect Toolkit

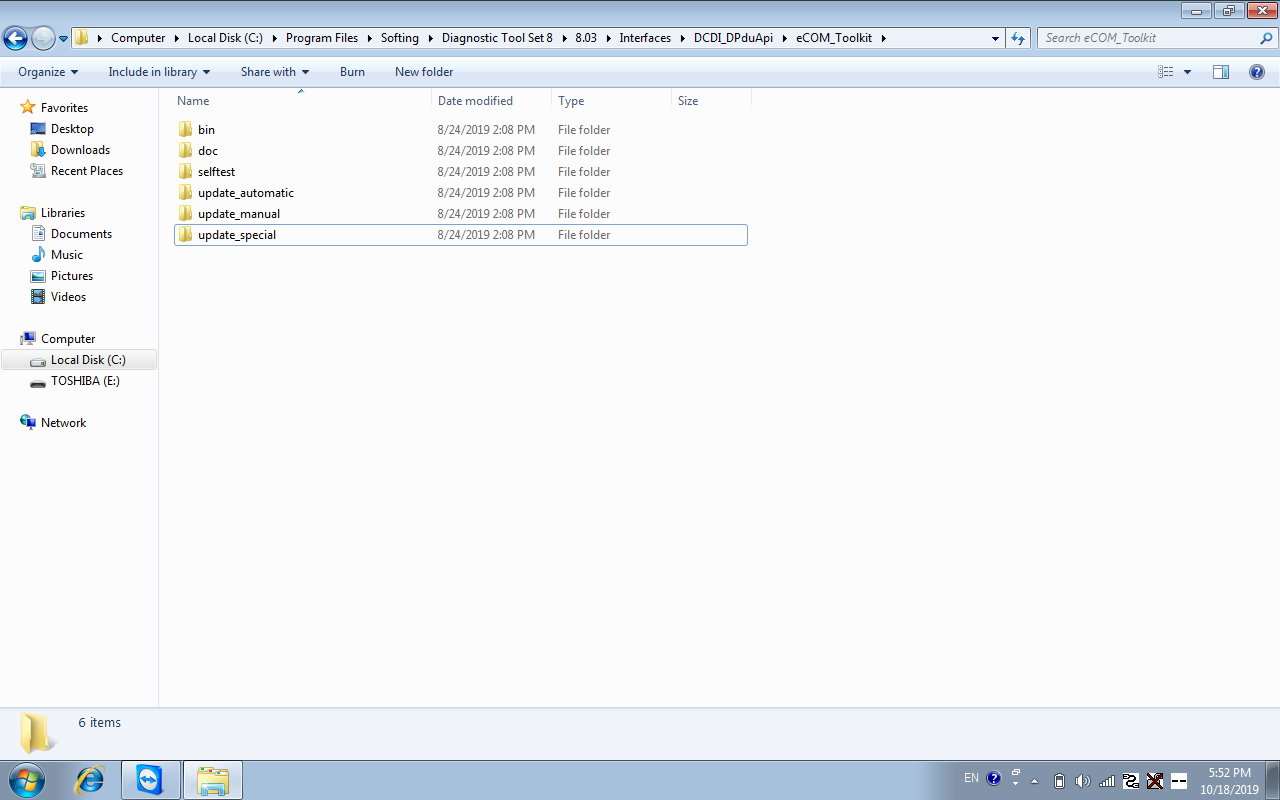
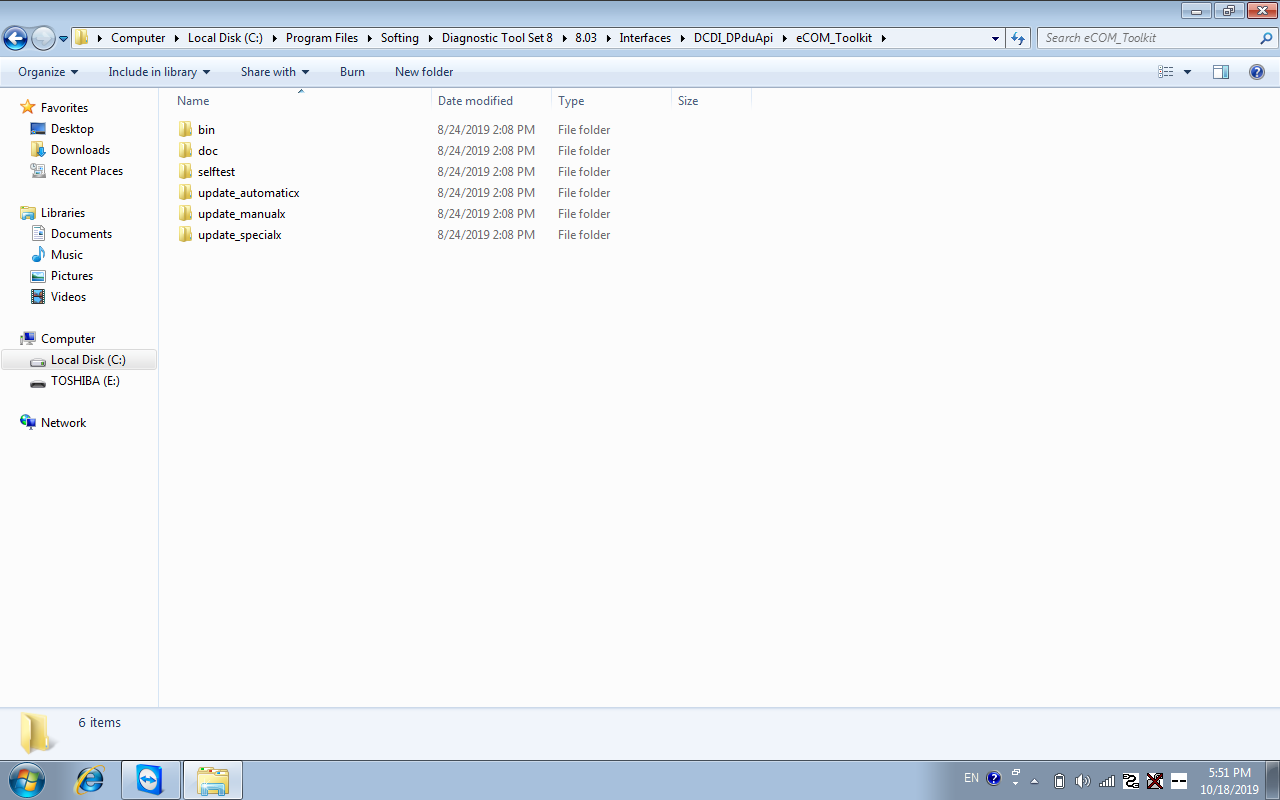
(2)Path two:C:\Program Files\Softing\Diagnostic Tool Set 8\8.03\Interfaces\DCDI_DPduApi\eCOM_Toolkit

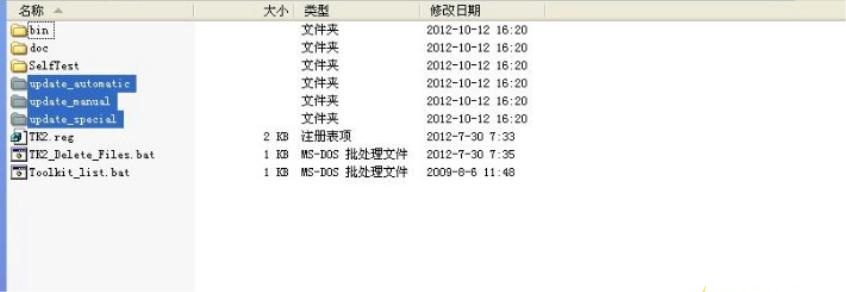
*   Change the three file names of update_automaticx, update_manualx, and update_specicalx under path one and path two to update_automatic, update_manual, and update_specical (remove the letter x at the end of the file name). After the modification, see Figures 3 and 4 below.
*   After changing the file name, the computer restarts
*   C4 and C5 need to install 6 AA batteries (see steps 1 pdf for details) [sp100-e doip hardware upgrades do not need to install batteries]
*   Obd main line should be connected to car or 12v power supply

How-to-Upgrade-MB-SD-C4-C5-Diagnostic-Tools-Hardware-3
How-to-Upgrade-MB-SD-C4-C5-Diagnostic-Tools-Hardware-4
How-to-Upgrade-MB-SD-C4-C5-Diagnostic-Tools-Hardware-5
How-to-Upgrade-MB-SD-C4-C5-Diagnostic-Tools-Hardware-6

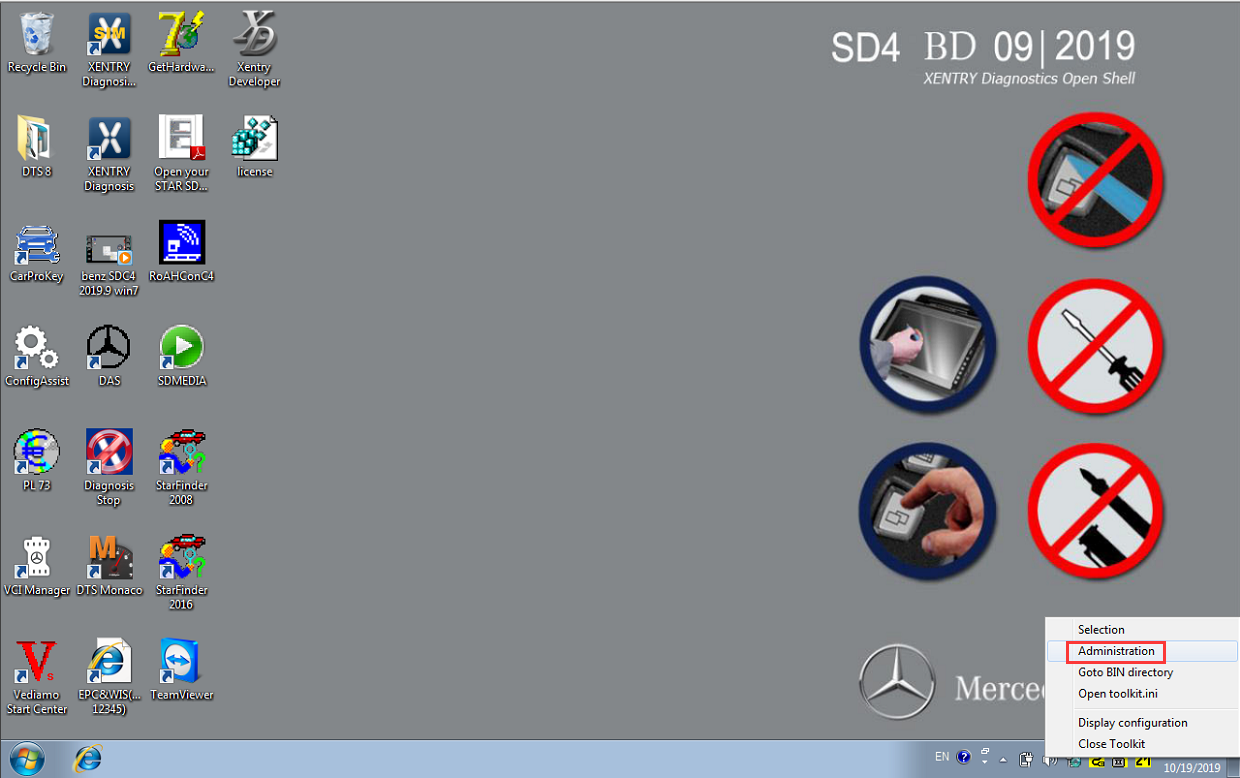
*   Right-click on the lower right corner of the computer to select administration, and then select Software update

How-to-Upgrade-MB-SD-C4-C5-Diagnostic-Tools-Hardware-7

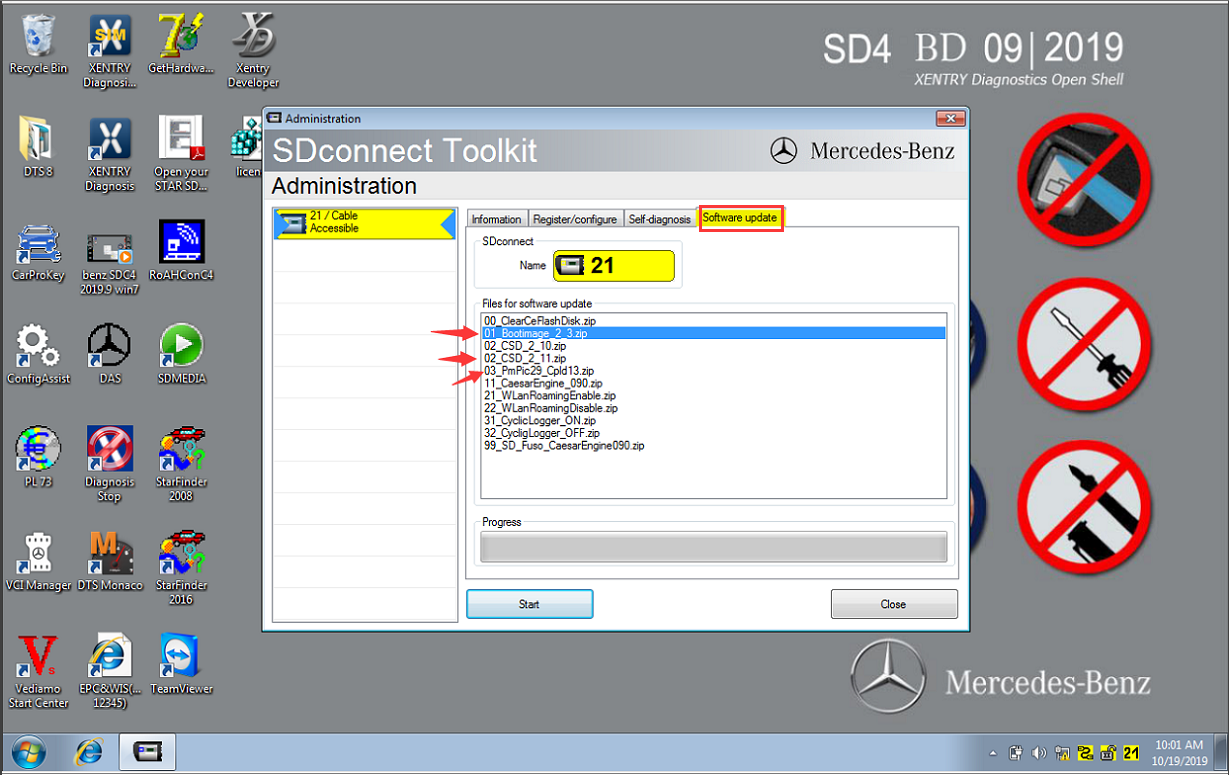
*   Mainly upgrade three files, as shown in the figure below, the upgrade sequence is 00——>02——》01——》03

How-to-Upgrade-MB-SD-C4-C5-Diagnostic-Tools-Hardware-8

As long as you follow the above upgrade instructions accordingly step by step, no problem would occur for your tool’s hardware. Wait for big success!

That’s all. Thank you for sharing your time with us!

Sunday, October 10, 2021

How to install MB SD C4 rechargeable batteries


Problem:

Hello MB star

I just recieved My tablet and it looks and work Very good .

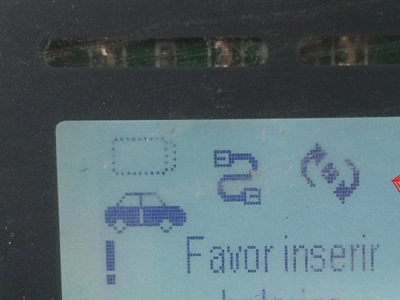
But The sd connect interface is Saying “please put in batteries”

What type of batteries is it ?

Solution:

This problem same to :

SD connect compact 4 mux display: Favor inserir baterias(Please insert batteries)

How-to-install-MB-SD-C4-rechargeable-batteries-1

Here you go :

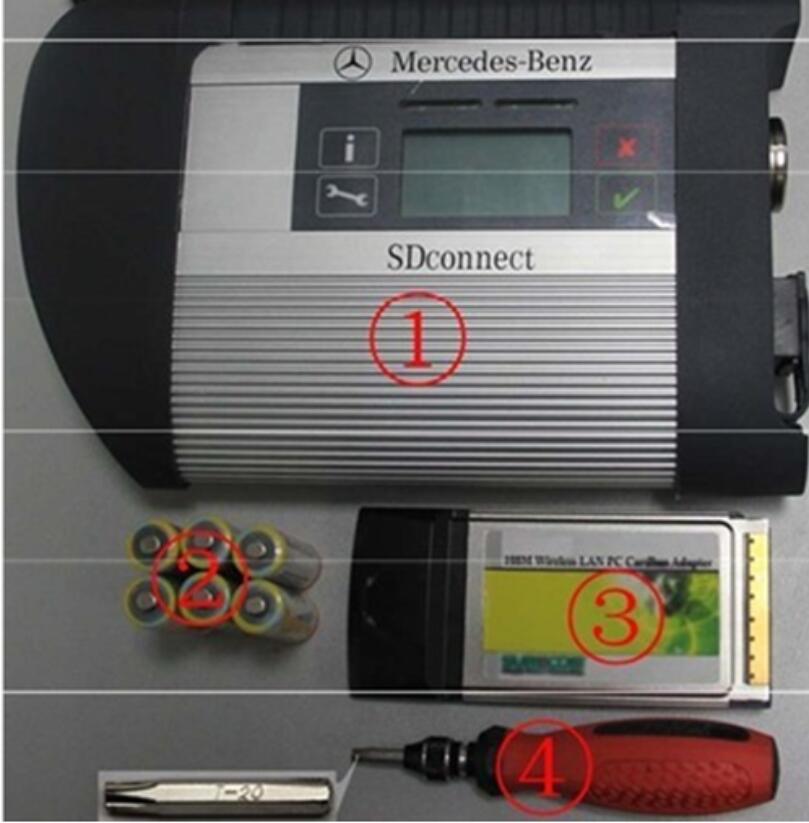
Please prepare the following tools:

How-to-install-MB-SD-C4-rechargeable-batteries-2

①— SDconnect multiplexer which need to input the batteries。

②— 6 units Ni-MH Rechargeable batteries,Size:AA, Voltage:1.2V, Capacity:above 1700mA。

③— 1 unit 108M WIFI Card。

④— Plum screwdriver,Specification:T-20

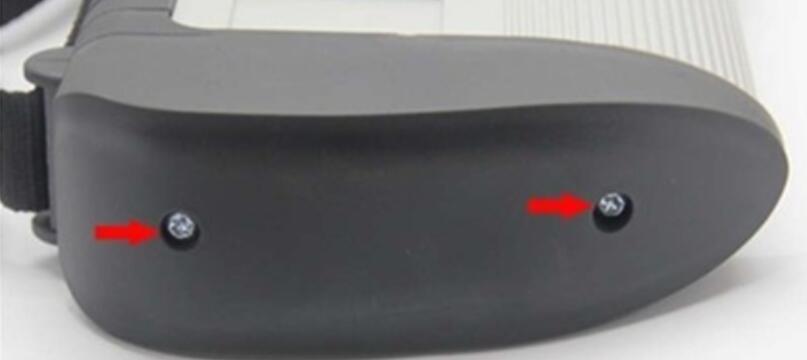
Take out the rubber:

2.1 Use the T20 Plum screwdriver to take out the screws as below.

How-to-install-MB-SD-C4-rechargeable-batteries-3

2.2 Take out the rubber as below.

How-to-install-MB-SD-C4-rechargeable-batteries-4

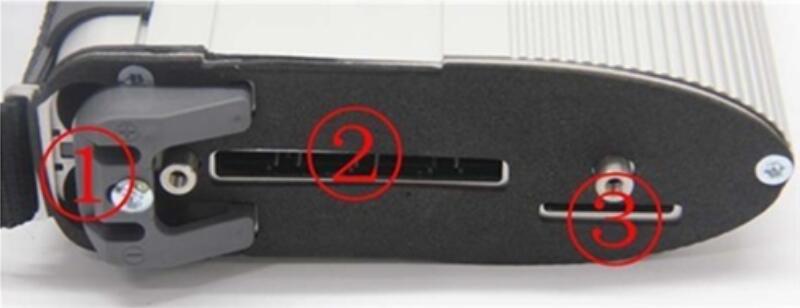
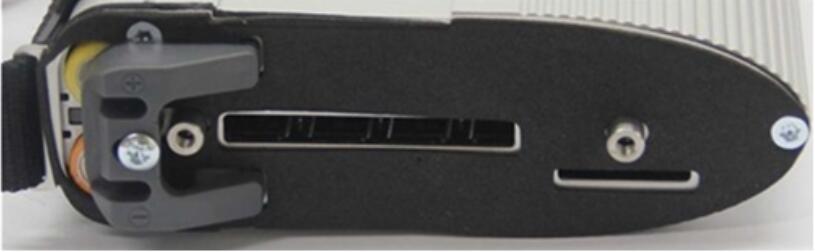
①— Batteries Space.

②— WIFI Card Space.

③— SD Card Space.

Insert the Rechargeable batteries.

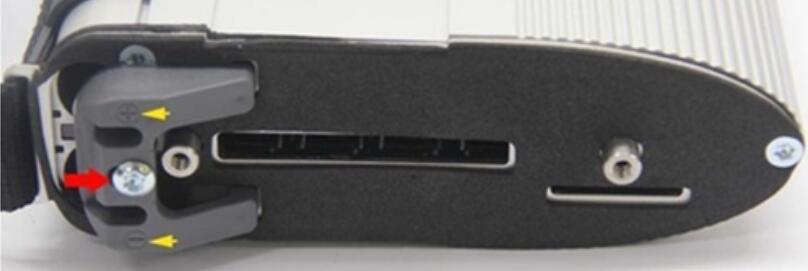
3.1 Use the T20 Plum screwdriver to take out the screws of Batteries Space fixation as below.

How-to-install-MB-SD-C4-rechargeable-batteries-5

3.2 Take out the fixation of Batteries Space. Pay attention to the Battery polarity marked in the Batteries Space.

How-to-install-MB-SD-C4-rechargeable-batteries-6

3.3 Insert the batteries. Note the Battery polarity.
How-to-install-MB-SD-C4-rechargeable-batteries-7

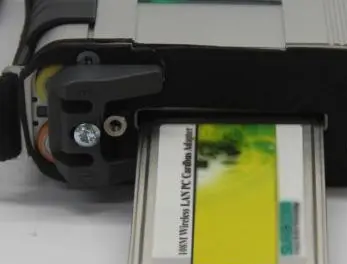
3.4 Button on the Fixation of Batteries Space after inputting the Rechargeable batteries.
How-to-install-MB-SD-C4-rechargeable-batteries-8

3.5 Use the T20 Plum screwdriver to fix the screws of Batteries Space fixation as below. Inserting the batteries is finished.

How-to-install-MB-SD-C4-rechargeable-batteries-9

Installing WIFI Card.

4.1 Inserting the WIFI Card into the WIFI Card Space. Please make the correct direction.

How-to-install-MB-SD-C4-rechargeable-batteries-10

4.2 Push it to make it totally connected.

How-to-install-MB-SD-C4-rechargeable-batteries-11

4.3 Cover the rubber and fix the screws to finish all the work.

How-to-install-MB-SD-C4-rechargeable-batteries-12

Note 1:

Go to the info section within DAS Xentry— search SDconnect and you will find what all the SDconnect symbols defined!!

How-to-install-MB-SD-C4-rechargeable-batteries-13

Note 2:

pls check these picture, you can choose self-diagnosis your SD connect c4

How-to-install-MB-SD-C4-rechargeable-batteries-14
How-to-install-MB-SD-C4-rechargeable-batteries-15


Friday, October 8, 2021

Update SD Connect without batteries

Question: Is it possible to update SD Connect C4 without batteries, because I am damaged and batteries do not work !!!.

Answer: It can be done perfectly.

If you need to update an SD Connect and you do not have batteries or the power supply/charging circuit is damaged, you only have to edit the toolkit.ini file, modifying the following lines so that the supply and/or battery voltage is lower to the real (it would be enough to set them to zero)

Obviously make sure you have a stable and sufficient external supply.

[SoftwareUpdate]
;
; Voltages necessary for SDconnect firmware updates. These values are only for the pre-check of the toolkit, the values will be checked by the update process again
;
MinUpdateVoltageVBatt=7200
MinUpdateVoltageVExt=11000

When to upgrade sdconnect C4 Plus firmware?

For example, one user feedback ” he has SD connect C4 Plus with Xentry 2020.3 software and try it to connect to the car and the computer with no luck, it fails to communicate”.

sdconnect-c4-plus-firmware-update-no-battery-01
sdconnect-c4-plus-firmware-update-no-battery-02
sdconnect-c4-plus-firmware-update-no-battery-03

The solution from Obd2tool.com chief engineer:

To upgrade SD connect C4 Plus firmware.

How to upgrade SD C4 Plus firmware without battery installation?

Open DAS software, enter the folder “C:\programm files\SDconnect Toolkit”, check if there are the following three folders: Update_automatic, Update_manual; Update_Special.. As shown in the figure below. If the name is wrong, please correct it.

sdconnect-c4-plus-firmware-update-no-battery-04

Reboot the computer.
Start to upgrade the SD C4 Plus firmware, please follow the procedure below:

1) Closing Xentry Diagnostics/Xentry DAS diagnostics application

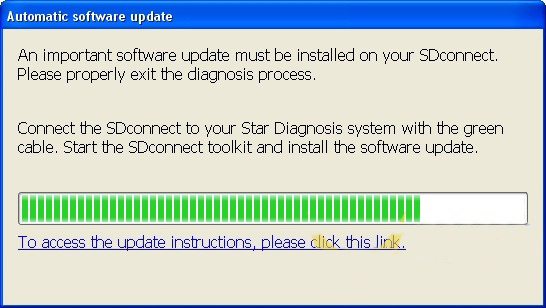
When accessing a vehicle in Xentry Diagnostics or Xentry DAS, the following message appears:

sdconnect-c4-plus-firmware-update-no-battery-05

Please exit the diagnostic application Xentry Diagnostics or Xentry DAS correctly and follow the next steps.

2) Connecting the SDconnect to the Star Diagnosis system

Connect the SDconnect to the Star Diagnosis system with the green LAN cable.

The SDconnect will be automatically selected and appear in the deskband on the Star Diagnosis system:

sdconnect-c4-plus-firmware-update-no-battery-06

3)SDnetControl

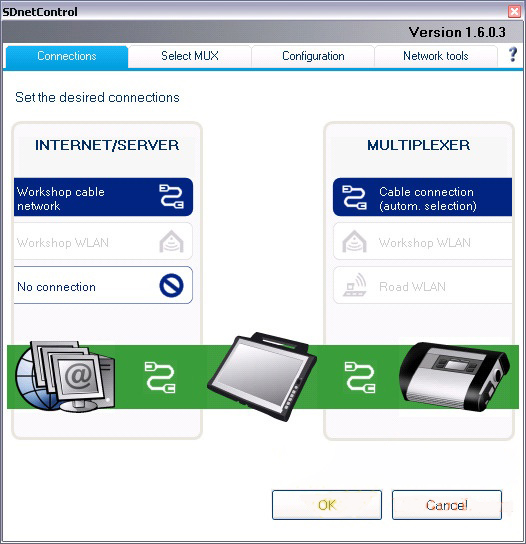
A) Start SDnetControl by clicking the deskband

Go to the “Connections” tab.

B)  Check whether automatic selection via the cable connection is active:

sdconnect-c4-plus-firmware-update-no-battery-07

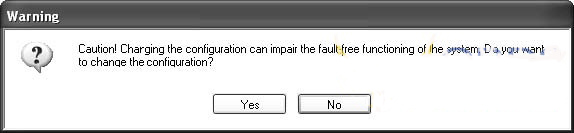
Go to the “Configuration” tab, and confirm the warning with “Yes”:

sdconnect-c4-plus-firmware-update-no-battery-08

4). Software update

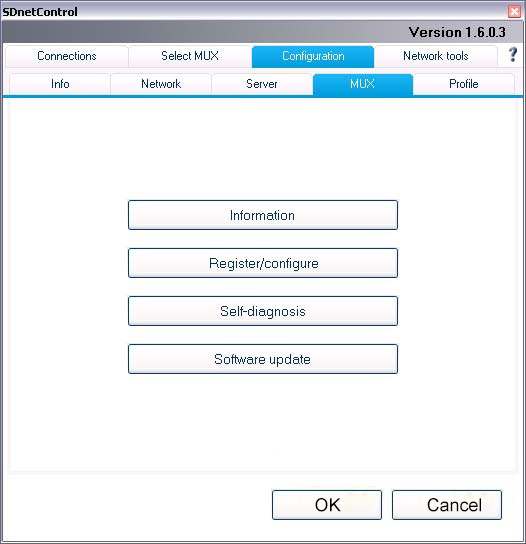
Go to the “MUX” tab in SDnetControl.

Click on the “Software update” button.

sdconnect-c4-plus-firmware-update-no-battery-09

The “SDconnect Toolkit Administration” program will start.

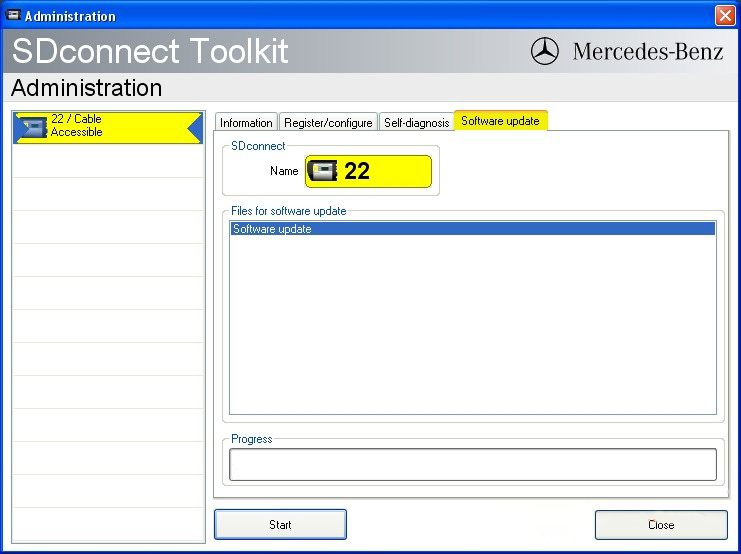
Go to the “Software update” tab in the SDconnect Toolkit.

Your SDconnect is already selected on the left-hand side.

Select the “Software update” packet under “Files for software update”.

Click “Start” to start the process.

sdconnect-c4-plus-firmware-update-no-battery-10

The update process will start. This takes approx. 4 minutes.

5) Complete the installation

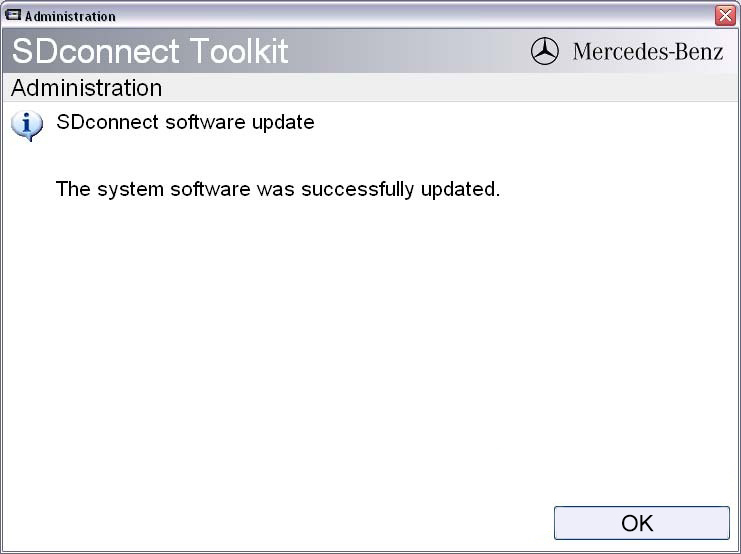
Confirm the successful completion of the update.

After a successful update, a message indicating the successful update completion appears.

Confirm the message by clicking “OK”.

sdconnect-c4-plus-firmware-update-no-battery-11

6) Check the installed software

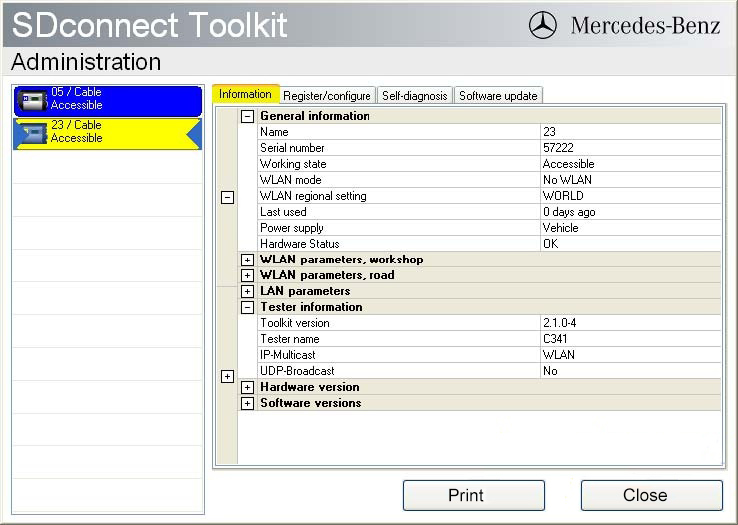
Go to the “Information” tab in SDconnect Toolkit

Select your SDconnect on the left-hand side.

Check the information under “Software versions” at the right:

The versions of the Linux OS and the CommandServer must be at least 2:0:xxxxxx.

sdconnect-c4-plus-firmware-update-no-battery-12

The SD Connect 4 plus firmware update is completed. The green LAN cable can be removed.