Showing posts with label mercedes star diagnostic tool. Show all posts

Friday, October 8, 2021

Update SD Connect without batteries

Question: Is it possible to update SD Connect C4 without batteries, because I am damaged and batteries do not work !!!.

Answer: It can be done perfectly.

If you need to update an SD Connect and you do not have batteries or the power supply/charging circuit is damaged, you only have to edit the toolkit.ini file, modifying the following lines so that the supply and/or battery voltage is lower to the real (it would be enough to set them to zero)

Obviously make sure you have a stable and sufficient external supply.

[SoftwareUpdate]
;
; Voltages necessary for SDconnect firmware updates. These values are only for the pre-check of the toolkit, the values will be checked by the update process again
;
MinUpdateVoltageVBatt=7200
MinUpdateVoltageVExt=11000

When to upgrade sdconnect C4 Plus firmware?

For example, one user feedback ” he has SD connect C4 Plus with Xentry 2020.3 software and try it to connect to the car and the computer with no luck, it fails to communicate”.
sdconnect-c4-plus-firmware-update-no-battery-01
sdconnect-c4-plus-firmware-update-no-battery-02
sdconnect-c4-plus-firmware-update-no-battery-03

The solution from Obd2tool.com chief engineer:

To upgrade SD connect C4 Plus firmware.

How to upgrade SD C4 Plus firmware without battery installation?

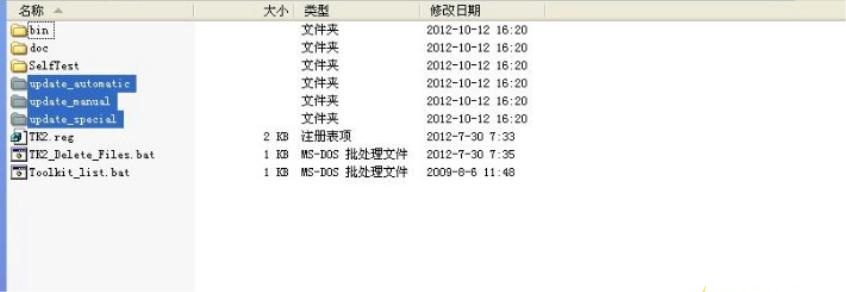
Open DAS software, enter the folder “C:\programm files\SDconnect Toolkit”, check if there are the following three folders: Update_automatic, Update_manual; Update_Special.. As shown in the figure below. If the name is wrong, please correct it.
sdconnect-c4-plus-firmware-update-no-battery-04

Reboot the computer.
Start to upgrade the SD C4 Plus firmware, please follow the procedure below:

1) Closing Xentry Diagnostics/Xentry DAS diagnostics application

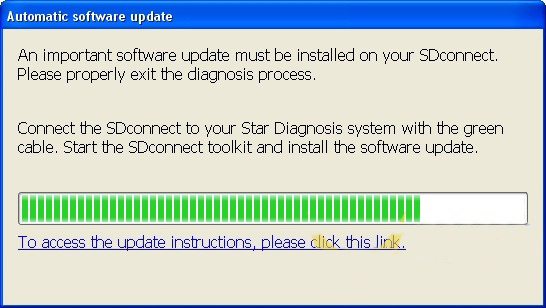
When accessing a vehicle in Xentry Diagnostics or Xentry DAS, the following message appears:
sdconnect-c4-plus-firmware-update-no-battery-05

Please exit the diagnostic application Xentry Diagnostics or Xentry DAS correctly and follow the next steps.

2) Connecting the SDconnect to the Star Diagnosis system

Connect the SDconnect to the Star Diagnosis system with the green LAN cable.

The SDconnect will be automatically selected and appear in the deskband on the Star Diagnosis system:

sdconnect-c4-plus-firmware-update-no-battery-06

3)SDnetControl

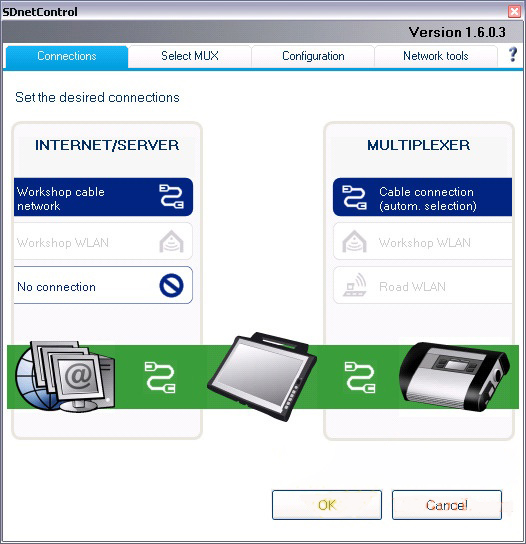
A) Start SDnetControl by clicking the deskband

Go to the “Connections” tab.

B)  Check whether automatic selection via the cable connection is active:
sdconnect-c4-plus-firmware-update-no-battery-07

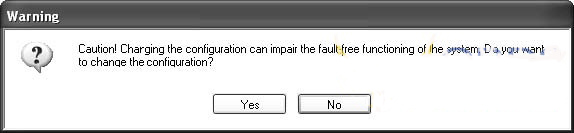
Go to the “Configuration” tab, and confirm the warning with “Yes”:
sdconnect-c4-plus-firmware-update-no-battery-08

4). Software update

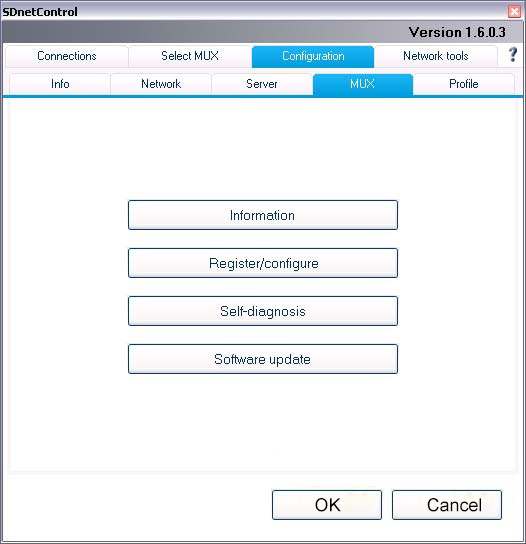
Go to the “MUX” tab in SDnetControl.

Click on the “Software update” button.
sdconnect-c4-plus-firmware-update-no-battery-09

The “SDconnect Toolkit Administration” program will start.

Go to the “Software update” tab in the SDconnect Toolkit.

Your SDconnect is already selected on the left-hand side.

Select the “Software update” packet under “Files for software update”.

Click “Start” to start the process.
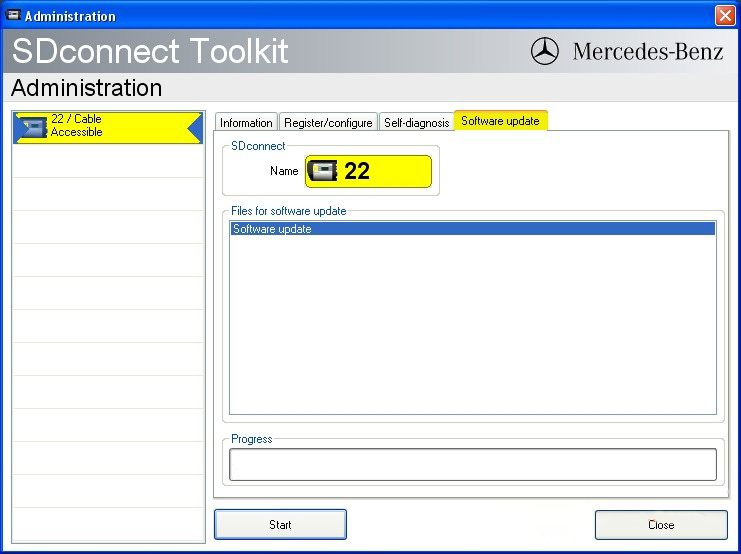
sdconnect-c4-plus-firmware-update-no-battery-10

The update process will start. This takes approx. 4 minutes.

5) Complete the installation

Confirm the successful completion of the update.

After a successful update, a message indicating the successful update completion appears.

Confirm the message by clicking “OK”.
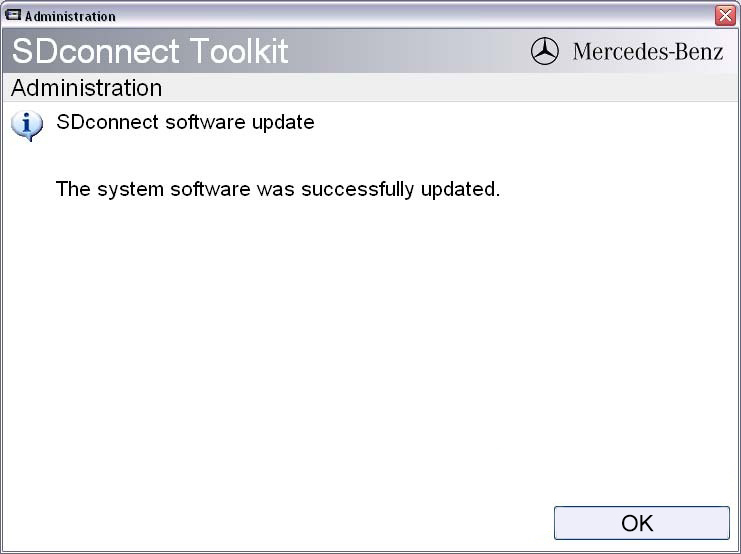
sdconnect-c4-plus-firmware-update-no-battery-11

6) Check the installed software

Go to the “Information” tab in SDconnect Toolkit

Select your SDconnect on the left-hand side.

Check the information under “Software versions” at the right:

The versions of the Linux OS and the CommandServer must be at least 2:0:xxxxxx.
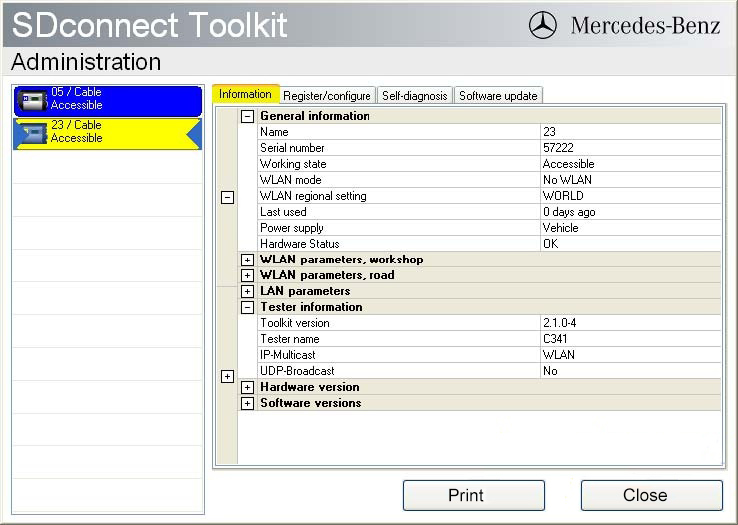
sdconnect-c4-plus-firmware-update-no-battery-12

The SD Connect 4 plus firmware update is completed. The green LAN cable can be removed.

Friday, March 23, 2018

2018. 03 MB SD Connect C4 C5 Xentry Start Key Activation

Here is the steps to teach you how to activate XENTRY:
Step 1: Double Check the icon name “starkey Center ” which on the computer desktop.
1
2
Record the computer’s Hardware ID
3
Step2: Double Check the folder”TOOLS” which on the computer desktop.
4
Run xentry developer V1.10
5
Step3:
As shown below: Enter the computer’s Hardware ID, Stat Date, Expiration Date. Calculate the license string.
8
7
Step4:Copy licenseto Start keys and save
8
9
10
11
Step5: Run xentry, as follows
12
We can supply Laptop + Software all ready for you.
We can supply FULL package C4 C5 SD + Laptop + Software for you.
We can carry out some C4 C5 SD repairs.
Remote installations available (if you supply the correct HDD size and install the correct Windows OS).
Teamviewer remote support available.
If you are interesting in buy MB Star Diagnostic Tools , Please contact our sales via sales@obd2tool.com

How to use SD connect C4 + Xentry/DAS on Macbook Pro


I’m running Xentry/DAS 2015.12 (not OpenShell) on my MacBook Pro together with SD Connect C4 via LAN cable and VMware. Works without problems.
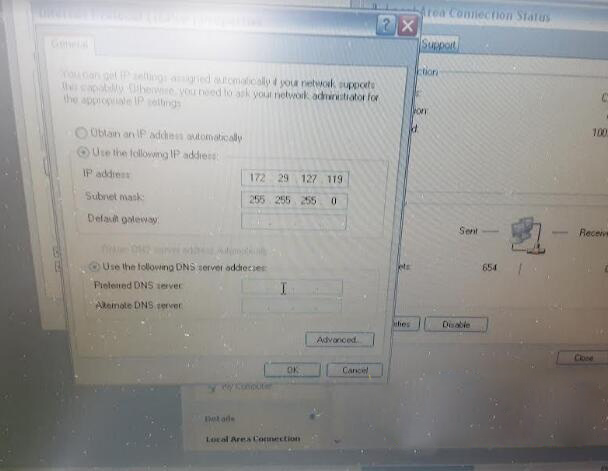
Need bridged networking in VMware. And adjust the network settings/IP addresses.
VMware:
Use VMware Fusion Professional and and allocate enough resources to the VM.
Mac hardware specification:
MacBook Pro, Core i7, 16GB RAM, 512 SSD, 15″ 1GbE, SuperDrive, Mid-2012
Virtualization:
That is the magic of virtualization. If you can locate a copy of Star Diagnosis that was intended for the IBM ThinkPad T30 running Windows NT 4.0 Workstation, you could easily install Windows NT 4.0 in a virtual machine and replicate that environment with near native performance. If you prefer to use a Windows XP-based version, that is easily done as well, up to and including Windows 10 1709 or Windows Server 2016. Almost any computer you purchase now will not have drivers available for Windows XP, so either an old PC such as a Dell D630/D830 will allow you to install Windows XP natively and make it work, but virualization takes the headache out of that. OS X us built on UNIX, so it is a very stable host OS and can run nearly any version of Windows was a guest with easy, stability and performance. The only think I would refrain from doing at this point in time, is if you are using OS X 10.13 High Sierra, do not use APFS just yet. It still is not as stable IMO as HFS+. You certainly don’t want to introduce system instability when programming a control module!
Battery:
The battery life is good when running Windows in a VM, as OS X has excellent power management. Allocate at 2 cores to the Windows VM, and if using an XP-based version, 2048GB of RAM should be sufficient.
In detail…How to setup Xentry/DAS on a Mac OS X
It is very straight forward. I elect to not use the automated installation of Windows, as it automatically configures the partition sizes, formats them, etc. Instead, do a custom installation and select your ISO. It will then determine the contents of the OS ISO and select your low-level hardware components automatically, such as CD-ROM bus, HDD bus, etc.
For the network cable, it defaults to NAT, so it shares the IP of OS X, but cannot receive unsolicited network traffic due to the nature of NAT. You can select Bridged, and it can have an IP on the same subnet as OS X.
I think I would prefer to install my installation from scratch, as the pre-built images that are distributed have an unknown product key, and also could contain malware or other unwanted applications.
If you are installing the XP version of DAS/Xentry, specify your virtual disk to be about 120GB, and when Windows XP asks you to specify your partition size, instead of pressing Enter and allowing it to consume the disk specify 20GB and quick format as NTFS. Create the remaining three partitions in Disk Management after XP completes installation.
Also, the first thing you will want to do is install VMware Tools after XP installs. If you want to install all available updates for Windows XP, and download WSUS Offiline version 9.2.3 and it will get your all of the available updates that were released when XP reached EOL.
I have used 12.2015, but if I still used it, I would revert back a few months to avoid the hard-coded timebomb that was implemented at the end of 2015.
Result:
I have used this setup for many years for control module programming and SCN coding with no issues from OBD2TOOL.

MB SD C4 Xentry activation complete but need to active again after reboot solution

Does your MB SD C4 meet such problem that Xentry activation complete, but requires to active again after reboot and again and again. If that, please follow this post for solution.
Take a MB SD C4 activation info for example:
1-1 1-2
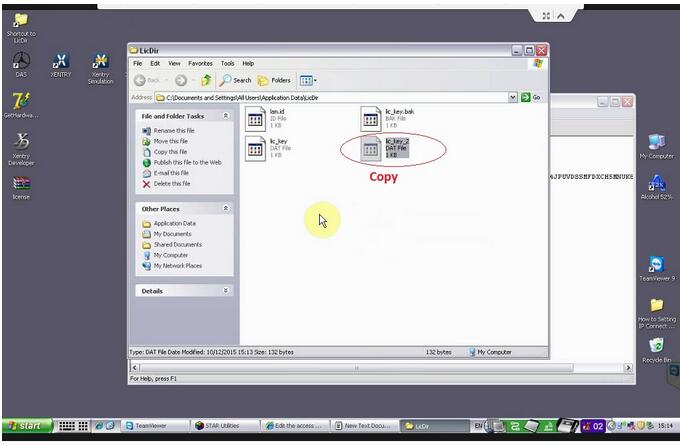
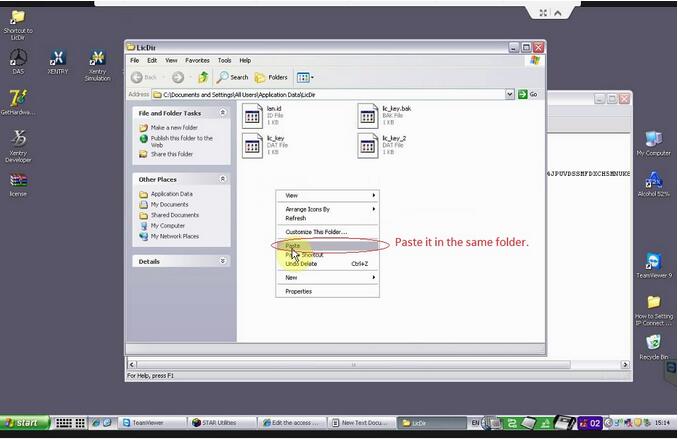
Right click the folder “Shortness to the LicDir”, copy “lic_key_2” and paste it into the same folder and has a new name “Copy of lic_key_2”.
1-3
1-4
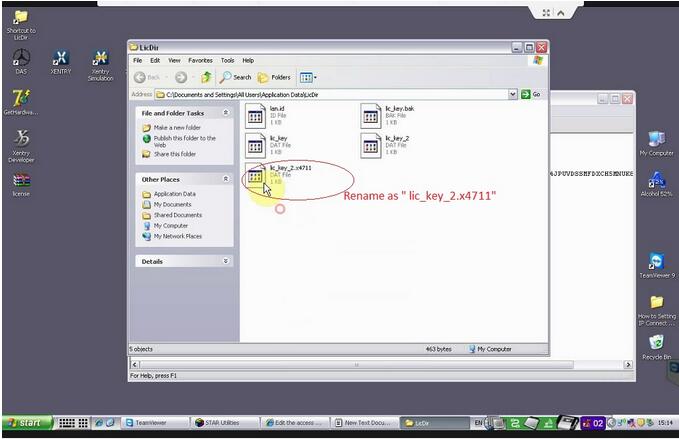
Right click “Copy of lic_key_2”, choose “Rename” and rename as ” lic_key_2.x4711″
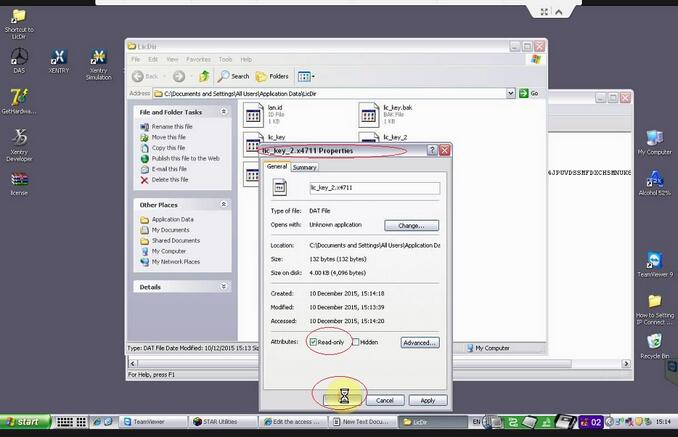
Right click “lic_key_2.x4711” and choose “Properties”, then tick on “Read only” and click on “Ok”.
1-5
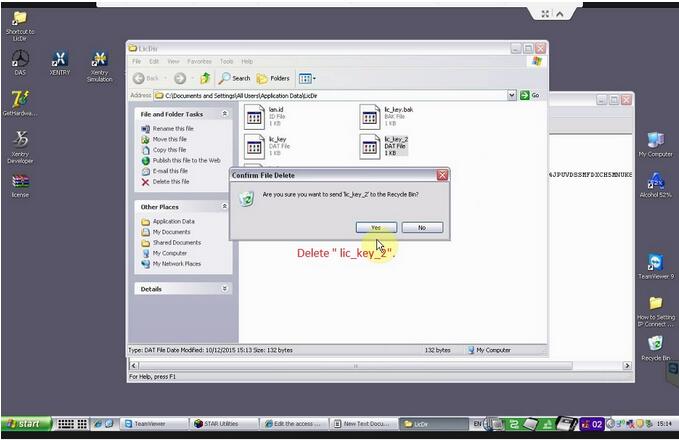
Delete ” lic_key_2″.
1-6
Done
Don’t you think it is too easy to solve the Xentry activation can’t save problem.